Replacing a ceiling fan is fairly easy and a great way to update your room. You'll just need some basic tools like screwdrivers, wire strippers, and a ladder for safe access. Start by turning off the power at the circuit breaker and checking your ceiling box to verify it's rated for a fan. Remove the old fan carefully, and connect the new one by matching the wires correctly. After securing everything, power it back on to test. With the right preparation, you'll handle it like a pro. More handy tips await to help guarantee a smooth installation!
Key Takeaways
- Replacing a ceiling fan is manageable with basic tools like screwdrivers, wire strippers, and a ladder for safe access.
- Ensure safety by turning off power at the circuit breaker before starting the replacement process.
- Check that the ceiling box can support the new fan's weight and vibrations for safe installation.
- Follow proper wiring procedures, inspecting for damage and securely connecting wires to prevent hazards.
- Troubleshooting issues like wobbling or noise can enhance performance, making maintenance straightforward after installation.

Aspen Creative 22013-1, Three-Light Ceiling Fan Light Kit with Pull Chain, Matte White Finish with Clear Glass Shades, 13-1/8" Diameter x 6-3/4" Height
Fixture Size: 13-1/8" D x 6-3/4" H | Glass Shades: 2-1/8" Fitter, 4-5/8" D x 4-5/8" H |…
As an affiliate, we earn on qualifying purchases.
As an affiliate, we earn on qualifying purchases.
Overview of Ceiling Fan Types

When choosing a ceiling fan, understanding the different types available is crucial for making the right selection. Ceiling fans come in various styles to suit your needs and space.
Standard fans, typically featuring blade spans of 29 to 56 inches, are the most common choice for residential settings. However, if you have a room with low ceilings—under 8 feet—you'll want to take into account low-profile fans. These designs guarantee you have adequate clearance without compromising airflow.
If energy efficiency is a priority, look for Energy Star-certified ceiling fans. These fans not only provide effective air circulation but also help reduce energy bills, making them a smart investment for your home.
When it comes to fan size, the recommended method for best airflow is to divide the room size in square feet by four. For larger spaces, you might even think about using two smaller fans instead of one larger one to maximize airflow.
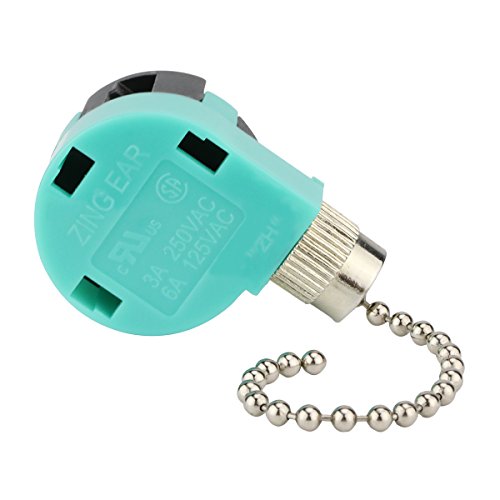
Ceiling Fan Switch 3 Speed 4 Wire Zing Ear ZE 268S6 Pull Chain Switch Control Replacement 3 Speed Control S Witch Ceiling Fans, Wall Lamps, Cabinet Light
Zing Ear Ceiling Fan Switch 3 speed 4 wire pull chain replacment: Model ZE-268S6.
As an affiliate, we earn on qualifying purchases.
As an affiliate, we earn on qualifying purchases.
Preparing for Fan Replacement

Before you start replacing your ceiling fan, gather the necessary tools like a screwdriver, wire strippers, and a ladder.
Don't forget to turn off the power at the circuit breaker to guarantee your safety.
Also, check that your ceiling box can support the new fan's weight and vibrations.
Tools and Materials Needed
Replacing a ceiling fan requires a few fundamental tools and materials to guarantee the job goes smoothly and safely.
First, gather your tools: you'll need both flathead and Phillips screwdrivers, wire cutters, wire strippers, and a sturdy ladder for safe access. A voltage tester is critical to verify there's no electricity flowing before you start working. This step is imperative for your safety.
Next, make certain you have a complete fan kit ready. This kit should include the fan blades, motor, light fixture, and all necessary mounting hardware. Having everything on hand before you start will save you time and frustration.
Don't forget to wear safety goggles to protect your eyes from any debris that might fall during the removal and installation process.
Finally, confirm you have wire nuts or twist-on connectors available for securely connecting the fan wires to your household wiring. These components are fundamental for a safe and efficient installation.
With the right tools and materials prepared, you'll be set to tackle the ceiling fan replacement with confidence.
Safety Precautions Checklist
Guaranteeing your safety is essential when you're preparing to replace a ceiling fan. Follow these precautions to guarantee a safe and effective replacement process.
| Safety Precaution | Description | Importance |
|---|---|---|
| Turn Off Power | Always turn off the power at the circuit breaker and confirm with a voltage tester. | Prevents electrical accidents. |
| Wear Safety Goggles | Protect your eyes from debris while working above your head. | Avoids injuries from falling materials. |
| Check Ceiling Box | Verify the ceiling box is fan-rated and securely fastened to a ceiling joist. | Provides necessary support for the fan's weight. |
Additionally, make sure your ladder is stable and placed on a flat surface to prevent falls during installation. Avoid working in wet conditions and ensure your hands are dry to prevent slips. By adhering to these safety measures, you can reduce the risk of accidents and enjoy a smooth ceiling fan replacement process. Always prioritize your safety and take the time to prepare adequately before diving into the task.

Southwire Electrical Box for Ceiling Fan, Light Fixture, 50lb Ceiling Fan and 75lb Light Fixture Support, Depth Adjustable, Gray, MSBFAN
Adjustable & Secure Installation: The Southwire Electrical Box offers quick setup and strong support as a durable electrical…
As an affiliate, we earn on qualifying purchases.
As an affiliate, we earn on qualifying purchases.
Tools Needed for Installation

When you're ready to install a ceiling fan, gathering the right tools can make the process smoother and safer. Here's a list of essential tools you'll need for your installation:
- Ladder for safe access
- Screwdrivers (flathead and Phillips)
- Wire cutters and strippers
- Voltage tester
- Wire nuts
First, a ladder is vital for reaching high places without risking your safety. You'll also need screwdrivers to secure the fan and its components properly.
Wire cutters will help you manage and trim any electrical connections, while strippers make it easy to prepare the wire ends for connections.
A voltage tester is essential in confirming that the power is turned off before you begin any electrical work. This step is key to ensuring your safety during installation.
Additionally, having wire nuts on hand allows you to securely connect the fan's wiring to your household wiring.
Lastly, consider having an adjustable wrench to tighten any bolts or nuts that secure the fan to the mounting bracket.
With these tools in hand, you'll be well-equipped to tackle your ceiling fan installation with confidence.
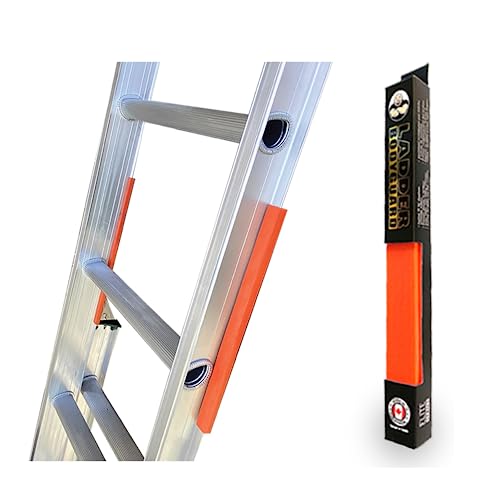
LADDER BODYGUARD Ladder Rail Covers for Gutters & Roof, Non-Marring Surface Protector, Helps Reduce Scratches & Dents | Extension & Multi-Position Ladder Accessory | Fits 1 1/8” Wide Offset “T”
✅ LADDER RAIL COVERS + GUTTER PROTECTOR (NON-MARRING SURFACE PROTECTION) Ladder Bodyguard ladder rail covers create a protective…
As an affiliate, we earn on qualifying purchases.
As an affiliate, we earn on qualifying purchases.
Safety Precautions to Consider

Before you start the installation, it's important to contemplate several safety precautions to keep yourself protected.
First and foremost, always turn off the power at the circuit breaker. This step is vital to prevent electrical shock while you're working on the ceiling fan. Once the power is off, grab a voltage tester to confirm that no electricity is flowing through the wires. This guarantees you're safe to handle them during installation.
Wearing safety goggles is a must. They protect your eyes from any debris or dust that might fall during the removal or installation process.
Additionally, make sure your ladder is stable and positioned on a flat surface. This minimizes the risk of falls while working at height, which can lead to serious injuries.
Lastly, avoid working in wet or damp conditions. Moisture can lead to slips and increase electrical hazards, putting you in danger.
Steps to Remove the Old Fan

Removing the old ceiling fan is a straightforward process that requires careful attention to detail. Follow these steps to guarantee a smooth removal:
- Turn off the power at the circuit breaker for safety.
- Remove the existing light fixtures by unscrewing any shades or bulbs.
- Support the fan with one hand while unscrewing it from the mounting bracket.
- Disconnect the wires by pulling off wire caps—start with the black wires, then the white, and finally the bare or green ground wire.
- Inspect the mounting box and wiring for any signs of damage or wear. Regularly checking air quality indices can inform necessary actions to improve indoor air quality.
Inspecting Electrical Compatibility

Before you install your new ceiling fan, check that your existing electrical box is fan-rated to handle its weight and vibrations.
Inspect the wiring for any signs of wear or damage, ensuring everything's safe and up to code.
Finally, make sure the electrical box is securely attached to a support beam to keep your fan stable during operation. Additionally, consider consulting a professional if you're unsure about the electrical compatibility of your existing setup.
Fan-rated Electrical Box
Safety is paramount when installing a ceiling fan, and that starts with making sure your electrical box is up to the task. You need to confirm that your electrical box is a fan-rated electrical box designed to support the weight and movement of ceiling fans.
Here are some key points to keep in mind:
- Look for a label or marking indicating the electrical box is fan-rated.
- Make certain it's securely fastened to a ceiling joist or support beam.
- Check that the box can handle the added weight of the ceiling fan.
- Verify that the wiring is in good condition to avoid electrical hazards.
- Replace any non-rated electrical box to prevent potential detachment of the fan.
If your existing electrical box isn't fan-rated, it's vital to replace it. Non-rated boxes may fail and could lead to dangerous situations, like the fan falling from the ceiling.
Always prioritize safety by using the correct electrical box and making sure it's properly mounted. Doing this won't only protect your investment but also guarantee the safe operation of your new ceiling fan for years to come.
Wiring Condition Assessment
Once you've confirmed your electrical box is fan-rated and securely mounted, the next step is to evaluate the condition of the wiring. Inspect the existing wiring for any signs of fraying, wear, or damage that could compromise both safety and functionality.
Look closely at the insulation—confirm there are no exposed wires that could pose an electrical hazard during or after installation.
Using a voltage tester, check for live wires before starting the replacement process. This step is essential; make sure the power is turned off at the circuit breaker to avoid any accidents.
After that, evaluate the compatibility of the existing wiring with your new fan's requirements. Typically, you'll be looking for connections for the black (hot), white (neutral), and green or bare (ground) wires.
If the wiring is in good condition and meets these specifications, you're on the right track. If you find any issues, consider consulting a professional electrician to confirm everything's safe and compliant.
Properly evaluating your wiring keeps your new ceiling fan functioning efficiently and securely for years to come.
Safety Compliance Checks
When replacing a ceiling fan, verifying electrical compatibility is fundamental for safe operation and longevity. You need to perform a few significant checks to confirm safety compliance before starting your installation.
- Confirm the existing electrical box is rated for ceiling fan support.
- Inspect wiring to verify it's in good condition, free of fraying or damage.
- Use a voltage tester to check that no electricity flows to the wires.
- Verify the ceiling fan's mounting bracket is compatible with the junction box.
- If necessary, consult a licensed electrician for upgrades.
These steps are important because typical light fixture boxes may not withstand the weight and movement of a ceiling fan, posing safety hazards.
Damaged wiring can lead to short circuits, while an incompatible mounting bracket can cause the fan to malfunction.
Always prioritize safety compliance; if your existing setup doesn't meet specifications, don't hesitate to seek professional help.
Following these guidelines won't only help you avoid risks but also extend the lifespan of your new fan, guaranteeing a reliable and efficient installation.
Installing the New Fan

Installing your new ceiling fan can be a straightforward process if you follow the manufacturer's instructions carefully. Start by assembling the mounting bracket according to the provided guidelines. Once that's done, secure it to the ceiling using the included mounting screws. Make sure it's tightly fastened to guarantee stability.
Next, you'll need to connect the fan wires to the existing light fixture. Match the black wires together, the white wires together, and ground the green or bare wire to the ground screw for safety. It's important to tuck the connected wires neatly into the ceiling junction box to avoid any exposed wires, which can be a safety hazard.
After securing the fan to the mounting bracket, attach the fan blades and light fixture as instructed. This step is vital for both aesthetics and functionality.
Once everything is in place, restore power at the circuit breaker to test the fan's operation. Check that it runs smoothly before making any adjustments. Following these steps will guarantee your fan is installed correctly and safely, providing you with comfort for years to come.
Connecting Wires Correctly

When you're connecting wires for your new ceiling fan, it's crucial to follow the correct wire color codes.
Make certain to secure your connections tightly to prevent any hazards, as loose wires can lead to serious issues.
Taking these steps will guarantee your fan operates safely and efficiently.
Wire Color Codes
Understanding wire color codes is essential for connecting your ceiling fan correctly and safely. Properly identifying and connecting the wires guarantees that your fan operates efficiently and reduces the risk of electrical hazards.
Here's a quick guide to help you:
- Black wires: Connect to the black wires for power.
- White wires: Always connect white to white for neutral.
- Green or bare wires: These are your ground wires—connect them to the grounding screw.
- Red wires: If your fan has a light fixture, you might see red as a second hot wire.
- Manufacturer instructions: Always check these, as some fans may have unique configurations.
Before you start, remember to turn off the power at the circuit breaker. Use a voltage tester to verify no electricity is flowing through the wires.
Following these wire color codes when connecting your ceiling fan will help you create a safe and functional setup. By accurately connecting black wires to black wires, white to white, and green or bare wires to the ground, you'll guarantee your ceiling fan operates as intended.
Secure Connections Importance
Secure connections are vital for the reliable operation of your ceiling fan. When wiring, it's important to match the colors correctly: connect black to black, white to white, and green or bare wire to the ground screw. This guarantees safe operation and minimizes the risk of electrical shorts or malfunctions.
Using wire nuts is key to achieving secure connections. Twist these nuts tightly onto the wires to avoid any loose wires that could lead to disconnections or arcing. If the connections aren't secure, your fan may not operate correctly, and you could face potential fire hazards.
After connecting the wires, neatly tuck them into the junction box. This prevents interference with the fan's operation and keeps exposed wiring at bay. Remember, it's not just about making the connections; it's about making sure they're secure.
Lastly, make it a habit to periodically check your connections after installation. Loose or damaged wires can lead to intermittent fan operation, increased wear on the motor, and even safety risks. Keeping everything tight and secure guarantees your ceiling fan runs smoothly and safely for years to come.
Final Assembly and Testing

The final assembly and testing of your ceiling fan are essential steps to guarantee it operates smoothly and safely. Once you've securely attached the fan to the mounting bracket, you're ready to move on.
Here's what you should focus on during this stage:
- Tighten all screws and fasteners to prevent wobbling.
- Attach the fan blades and light fixture according to the manufacturer's instructions.
- Restore power at the breaker box.
- Test the fan operation for unusual noises or wobbling.
- Verify that the fan blades rotate freely and without obstruction.
After completing the final assembly, it's vital to test the fan. Once you restore power, check for any odd sounds that might indicate improper installation.
Additionally, make sure the fan blades rotate smoothly; adjust their positioning if they're obstructed. A clean and organized workspace will help you keep track of everything, so dispose of any packaging materials properly.
Finally, reviewing maintenance tips will guarantee your fan performs at its best for years to come. By following these steps, you'll set up your ceiling fan for successful operation.
Troubleshooting Common Issues

Troubleshooting common issues with your ceiling fan can save you time and guarantee peak performance.
If your fan's wobbling, start by checking that all blades are securely attached and balanced. Uneven blade alignment can lead to instability during operation.
For fans that won't turn on, verify power is supplied by confirming the circuit breaker is on and using a voltage tester to check for live wires at the junction box.
If your fan operates but produces noise, inspect for loose mounting screws or worn bearings, as these can cause rattling or grinding sounds. Regular maintenance can prevent dangerous situations that arise from mechanical failures.
For remote-controlled fans that aren't responding, replace the remote batteries and verify the receiver is properly wired and connected within the fan assembly.
If the fan isn't reversing direction as intended, check that the reverse switch is functioning correctly and that the fan wiring aligns with the manufacturer's specifications for direction control.
Frequently Asked Questions
Can You Replace a Ceiling Fan on Your Own?
Yes, you can replace a ceiling fan on your own if you have some basic electrical knowledge and the right tools.
Start by turning off the power at the circuit breaker and using a voltage tester to guarantee safety. Familiarize yourself with the wiring colors, and follow the manufacturer's instructions closely.
Proper preparation is key, so check the ceiling box's rating and make sure you've got all necessary components before getting started.
Do You Need an Electrician to Replace an Existing Ceiling Fan?
Did you know that about 56% of homeowners choose to tackle ceiling fan replacements themselves?
While you might feel confident in your skills, hiring an electrician can make certain everything's done safely and correctly.
If you're unsure about electrical work or if your existing setup is outdated, it's wise to call a pro.
They'll guarantee that the fan is properly wired, securely mounted, and compliant with safety standards, giving you peace of mind.
How Hard Are Ceiling Fans to Replace?
Replacing a ceiling fan isn't too hard if you've got some basic DIY skills.
You'll need a few tools like a screwdriver and wire strippers, which you probably already have. Understanding wiring color codes makes it easier, too.
Most fans come with clear instructions, guiding you through the steps. Just remember to test the fan before attaching the blades to catch any issues early on.
You can definitely handle this project!
Is It Safe to Install a Ceiling Fan Yourself?
Yes, it's safe to install a ceiling fan yourself if you follow proper electrical safety protocols.
Start by turning off the power at the circuit breaker and using a voltage tester to verify no electricity is flowing.
Use a fan-rated electrical box to support the fan's weight.
Familiarize yourself with wiring colors to make correct connections.
Always wear safety goggles and use a stable ladder.
If unsure, consult a licensed electrician for guidance.
Conclusion
In summary, replacing a ceiling fan isn't as intimidating as it may seem. Many believe it requires professional help, but with the right tools and a bit of patience, you can tackle it yourself. Just remember to follow safety precautions and double-check your wiring connections. Once you've completed the installation, you'll not only enjoy a cooler space but also take pride in your DIY skills. So, why not give it a shot? You might surprise yourself!