
TL;DR
Moving your rig into a closet or small space cuts noise and reflections more effectively than foam alone. Proper placement, ventilation, and sealing matter most. You can learn more about acoustic dampening and setup tips. Treating first reflection points and using decoupling prevent sound leakage and resonance.
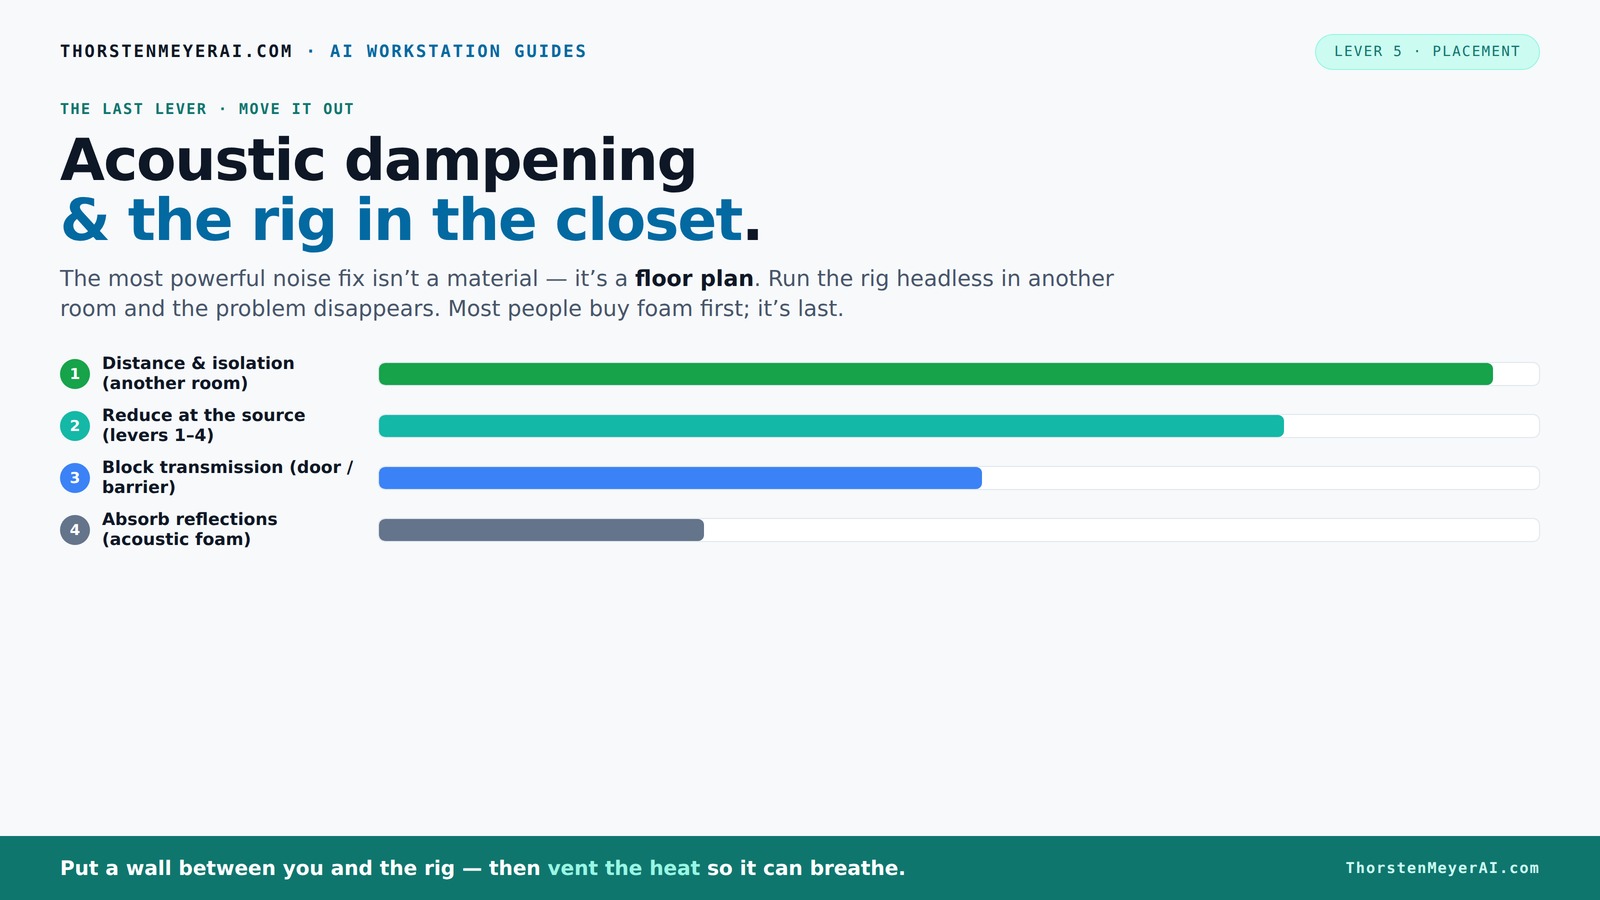
Acoustic dampening
& the rig in the closet.
The most powerful noise fix isn’t a material — it’s a floor plan. A rig you can’t hear because it’s in another room beats any amount of foam. Tap the approaches in Part 1 to see what actually works.
(another room)
(levers 1–4)
(door / barrier)
(acoustic foam)
Contain the noise, not the heat
Key Takeaways
- Moving your rig into another room or closet is the most effective noise reduction method, especially for high-power AI setups.
- Proper ventilation and heat management are critical when placing a machine in a sealed space—use exhaust fans and ducting.
- Acoustic treatment in small spaces should focus on first reflection points and adding absorption on walls, ceiling, and door.
- Sealing gaps around doors and outlets prevents sound leaks and enhances overall quietness.
- Microphone placement and using reflection filters significantly improve recording clarity in small, reflective environments.
Why Moving Your Rig Isn’t Just About Silence—It’s About Control
The biggest win in noise control is distance. When your noisy, heat-generating rig lives in another room, your workspace stays silent. Imagine your GPU working hard—fans whirring, fans vibrating—yet you barely hear it because it’s tucked away. This is especially true for AI inference rigs, which often draw over 600W and produce relentless heat and noise. By putting your machine in another room, you cut down the sound transmission by 90% or more. This approach is so effective, it makes acoustic foam and barriers seem almost pointless. Plus, it lets your gear breathe—no risk of overheating or throttling.
How a Closet Setup Can Make Your Rig Whisper-Quiet (But Watch Out for Heat)
Putting your noisy machine in a closet sounds perfect—quiet, out of sight. But here’s the catch: heat. A sealed closet traps warmth, turning a high-performance GPU setup into an oven. If you don’t vent it properly, temperatures soar, fans ramp up, and noise levels spike again. The trick is to provide ventilation—passive vents or better, a quiet exhaust fan—so heat can escape. For detailed cooling options, see this heat and noise reduction guide. Consider a purpose-built soundproof cabinet, which combines insulation with temperature-controlled airflow. This setup keeps your system cool without turning the closet into a sauna. For more on cooling options, check out this heat and noise reduction guide.
The Secrets to Acoustic Dampening in Small Spaces: First Reflection Points & More
Acoustic dampening isn’t just about making a space silent; it’s about managing how sound behaves within it. In a tiny closet or small room, sound waves bounce off surfaces, creating echoes, muddiness, and resonance that can distort your recordings or make listening unpleasant. Understanding the importance of first reflection points—these are the spots where sound waves bounce directly back to your ears or microphone—allows you to target your treatment effectively. By placing acoustic panels or reflection filters at these critical points, you prevent sound from bouncing around and creating a chaotic acoustic environment. Additionally, soft materials like foam or blankets absorb sound energy, reducing reverberation. Bass buildup in small spaces can cause boomy, muddy sound; bass traps in corners help tame these low frequencies, providing a clearer, more balanced sound. Think of your closet as a tiny concert hall—treat it like one, but with DIY-friendly materials that prevent sound from bouncing uncontrollably and muddying your recordings or listening experience. This strategic approach ensures your space remains manageable and your sound quality high, even in tight quarters. You might also find this article on acoustic dampening helpful.
How to Seal Gaps & Reduce Sound Leaks in Your Closet Studio
Sound leaks through gaps. Doors, outlets, wall joints—tiny cracks act like sound highways. For a true quiet space, seal every crack with weatherstripping or acoustic sealant. The door’s weak point? Replace it with a dense, solid-core door or add a heavy moving blanket with grommets for extra damping. Check around outlets and vents—use foam gaskets or outlet covers. Remember, sealing isn’t just about soundproofing; it also prevents heat from escaping and keeps your climate controlled. A well-sealed closet turns into a mini sound fortress—without needing a full renovation.
Microphone Placement: The Key to Clear Recordings & Less Room Sound
Where you place your mic matters more than you think. In a small closet, position it close to the sound source—your voice—aimed at the first reflection point. Use a reflection filter or a portable shield to block unwanted sound. Keep the mic at mouth level, about 6-12 inches away, to capture the best tone without picking up too much room echo. Proper placement reduces the amount of reflected sound captured, which minimizes the need for extensive treatment later. It also ensures your recordings are clearer and more natural, because the mic is hearing your voice directly rather than bouncing reflections. This strategic positioning allows you to retain clarity even in a reflective space, giving you cleaner recordings with less post-processing. Essentially, mic placement is your first line of defense against room-induced noise and resonance—making your sound crisp and professional without complicated setups.
Ventilation Tips to Keep Your Closet Rig Cool and Quiet
Good ventilation is non-negotiable. A hot rig in a sealed closet will throttle performance and ramp up noise. Use a quiet exhaust fan—look for models with less than 20 dB noise rating—and set up ducting to move hot air out. Passive vents help, but they’re slower and less effective at removing heat quickly. For high heat loads, consider an inline fan with a thermostat to turn on only when needed—this prevents unnecessary noise and energy waste. An liquid cooling system can also export heat more efficiently, maintaining optimal temperatures without noisy fans. Proper airflow not only cools your hardware but also prevents heat buildup, which can cause thermal throttling and increase fan noise. Balancing effective cooling with minimal noise involves choosing quieter fans, strategic placement of vents, and possibly active cooling systems that adapt to temperature. Learn more about soundproofing and cooling strategies. This way, your rig stays cool, quiet, and efficient, ensuring long-term stability and performance.
Putting It All Together: Your Step-by-Step Closet Rig Setup
Ready to turn your closet into a quiet, cool studio? Here you can find more tips on home decor and DIY projects to optimize your space.’s a quick checklist:
- Choose a well-ventilated spot—preferably with a door you can seal or reinforce.
- Seal all gaps—use weatherstripping, gaskets, or blankets.
- Place acoustic panels at first reflection points—behind the mic, on side walls, ceiling.
- Position your mic carefully—close, aimed at reflection points, with a filter.
- Install a quiet exhaust fan for ventilation—preferably with a thermostat.
- Use rubber feet or anti-vibration mounts to reduce structure-borne noise.
- Test and tweak—listen for leaks, resonance, and heat buildup.
This approach maximizes sound quality, keeps your rig cool, and minimizes noise distractions. Balancing these elements ensures your space remains acoustically controlled, thermally stable, and free from unwanted noise, creating an optimal environment for work or recording.