To test ceiling fan capacitors, first disconnect the fan and discharge the capacitor to prevent shocks. Use a multimeter set to capacitance mode to measure the capacitor’s value, guaranteeing it falls within the specified range; low or zero readings indicate failure. For switches, access the terminals and test continuity with a multimeter in resistance or continuity mode, confirming it switches properly. Following these steps helps ensure safety and accuracy—continue exploring for detailed testing procedures.
Key Takeaways
- Disconnect the fan from power and locate the capacitor and switch before testing.
- Use a multimeter with capacitance and continuity settings to test each component.
- Discharge the capacitor safely, then measure its capacitance to check for proper values.
- Test the switch’s continuity by activating it and observing the multimeter’s response.
- Replace faulty components, reassemble the fan, and verify proper operation after testing.
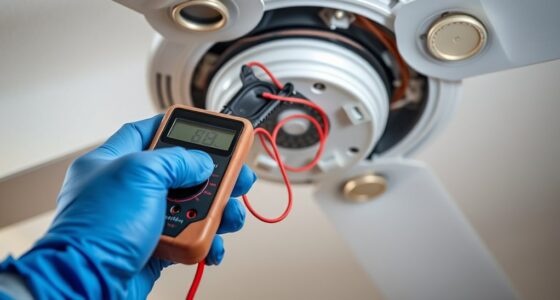
Testing ceiling fan capacitors and switches is essential for diagnosing electrical issues and guaranteeing safe operation. Proper testing helps identify faulty components that can cause malfunction, noise, or electrical hazards. Before beginning, disconnect the fan from power to prevent electrical shock. Use a multimeter with capacitance measurement capability for testing capacitors, and a continuity tester or multimeter set to resistance mode for switches. Confirm that the fan is completely powered off and unplugged before proceeding.
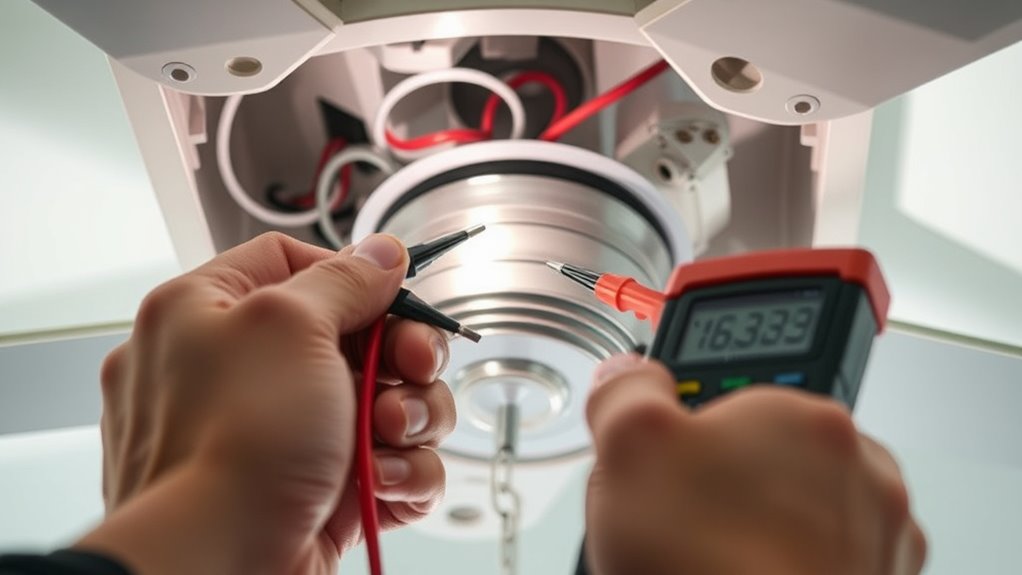
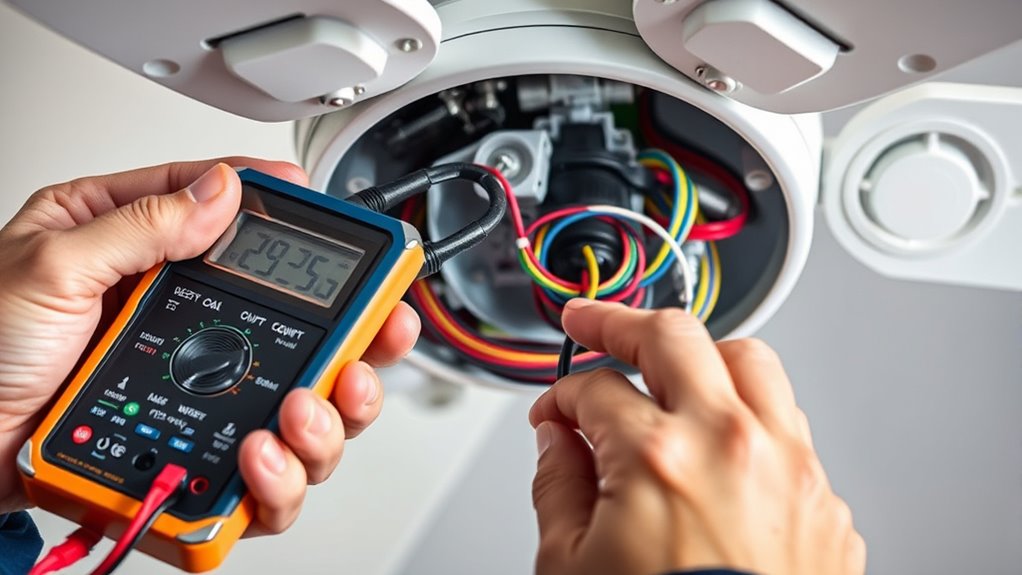
To test the capacitor, first locate it within the fan housing. Carefully discharge it by connecting its terminals with a screwdriver that has an insulated handle or a resistor to prevent stored charge from causing injury. Once discharged, disconnect the capacitor terminals from the circuit. Set your multimeter to measure capacitance, ensuring it’s within the manufacturer’s specified range, often marked on the capacitor casing. Connect the multimeter leads to the capacitor terminals—red to one terminal, black to the other. A reading within the specified range indicates the capacitor is likely functioning correctly; a noticeably lower or zero reading suggests a failed capacitor that can cause the fan to run intermittently or not at all.
When testing the switch, access its terminals by removing the fan cover or mounting plate. Set your multimeter to continuity mode or resistance mode. Place the probes on the switch terminals, then activate the switch. In the ON position, the multimeter should beep or show a near-zero resistance, indicating continuity. In the OFF position, there should be no continuity, reflected by no beep or an infinite resistance reading. If the switch does not behave as expected—either showing continuity in the OFF position or no continuity when ON—replace the switch. Faulty switches can cause intermittent operation, buzzing sounds, or complete failure to turn on the fan.
Additionally, AI security vulnerabilities in electronic components can sometimes affect the safety and functionality of modern fans that incorporate smart or networked features, so always ensure all parts are genuine and functioning properly. Always verify your measurements against the manufacturer’s specifications or standard values. If you find that the capacitor’s capacitance is outside the acceptable range or the switch fails to demonstrate proper continuity, replace the faulty component before reinstalling and powering the fan. After testing and replacing any defective parts, reassemble the fan, restore power, and observe its operation closely for stability and noise. Accurate testing of capacitors and switches not only prevents potential electrical hazards but also guarantees the fan operates efficiently and reliably.

New CEILING FAN CAPACITOR CBB61 4.5uf + 6uf + 5uf 5 WIRE 250V
This is a CBB61 4.5uf+6uf+5uf 5 WIRE capacitor Tolerance 5%, 250V AC and 50/60Hz rating.
As an affiliate, we earn on qualifying purchases.
As an affiliate, we earn on qualifying purchases.
Frequently Asked Questions
Can Faulty Capacitors Cause Ceiling Fan Noise?
Yes, faulty capacitors can cause ceiling fan noise. When a capacitor deteriorates, it struggles to maintain proper electrical flow, leading to irregular motor operation. This irregularity often produces humming, buzzing, or squealing sounds during operation. In some cases, the noise results from the motor trying to compensate for the faulty capacitor, causing vibrations. Replacing the defective capacitor typically resolves the noise issue and restores smooth, quiet fan operation.
How Often Should I Test My Ceiling Fan Capacitors?
Think of your ceiling fan as a finely tuned engine that needs regular checkups. You should test your capacitors every 1 to 2 years, especially if you notice unusual noises, wobbling, or reduced airflow. Regular testing helps catch potential failures early, preventing motor damage or fire hazards. Use a multimeter to verify capacitance and confirm the readings match the manufacturer’s specifications for safe, efficient operation.
Are There Safety Precautions Before Testing Switches and Capacitors?
Yes, you should take safety precautions before testing switches and capacitors. First, turn off the power supply at the circuit breaker to prevent electrical shock. Use insulated tools and wear rubber gloves. Verify that the fan is completely de-energized with a multimeter before handling any components. Always discharge capacitors properly to avoid stored energy causing injury. Following these steps guarantees safe and accurate testing procedures.
What Tools Are Needed to Test Ceiling Fan Components?
You’ll need a multimeter to test ceiling fan components accurately. Set the multimeter to measure capacitance for capacitors and resistance for switches. A screwdriver helps you access the fan’s wiring and disconnect the components safely. Use insulated gloves and safety goggles for protection. While it may seem straightforward, precision tools like a multimeter guarantee reliable results, preventing potential damage or hazards during testing.
How Do I Identify a Burnt or Damaged Capacitor Visually?
You can identify a burnt or damaged capacitor by inspecting it visually. Look for bulging, swelling, or leakage on the capacitor’s body, especially around the top or sides. Discoloration, cracks, or burn marks are also signs of damage. If the capacitor appears deformed or leaks a brownish or crusty substance, replace it immediately. Always verify the power is off before inspecting, and handle components carefully to avoid injury.

AstroAI Digital Multimeter Tester 2000 Counts with DC AC Voltmeter and Ohm Volt Amp Meter; Measures Voltage, Current, Resistance, Continuity and Diode, Blue
Additional Tips – The following incorrect operations may cause the multimeter not to show results: Firstly, the plugs…
As an affiliate, we earn on qualifying purchases.
As an affiliate, we earn on qualifying purchases.
Conclusion
By mastering these testing techniques, you’ll become a ceiling fan troubleshooting wizard, capable of pinpointing faults faster than a lightning strike. With precise measurements and careful inspections, you’ll save yourself from costly replacements and prevent potential electrical disasters. Remember, a faulty capacitor or switch isn’t just an inconvenience—it’s a ticking time bomb threatening your safety and comfort. Regular testing guarantees your fan operates flawlessly, transforming your space into a perfectly cooled sanctuary with the confidence of a true electrical expert.
New CEILING FAN CAPACITOR CBB61 4.5uf + 6uf + 5uf 5 WIRE 250V
This is a CBB61 4.5uf+6uf+5uf 5 WIRE capacitor Tolerance 5%, 250V AC and 50/60Hz rating.
As an affiliate, we earn on qualifying purchases.
As an affiliate, we earn on qualifying purchases.

Professional Wire Continuity Tester Electronic Circuit Testing Tool with Sound and Visual Indicator for PCB Board Cable Switch Testing Measurement 9V Battery Operated(C)
[AUDIBLE SYSTEM] The tester includes a loud buzzer that reaches up to 100 decibels, ensuring you can hear…
As an affiliate, we earn on qualifying purchases.
As an affiliate, we earn on qualifying purchases.