
Before installing a ceiling fan, first turn off power at the main breaker and verify no voltage is present with a circuit tester. Use a secure ladder and support the fixture while removing mounting screws or nuts. Disconnect wires carefully, noting their configuration, and confirm there’s no damage. Inspect the electrical box for stability; if necessary, replace or reinforce it. Proper safety precautions and adherence to procedures are essential for a successful upgrade—continue for a detailed step-by-step process.
Key Takeaways
- Turn off power at the main breaker and verify with a circuit tester before removing the fixture.
- Support the fixture securely while loosening mounting screws or nuts to prevent falls.
- Carefully disconnect wiring, noting the configuration, and remove wire nuts or connectors.
- Inspect the electrical box for stability and suitability for ceiling fan installation.
- Properly dispose of or store the old fixture and prepare the wiring for the new ceiling fan.
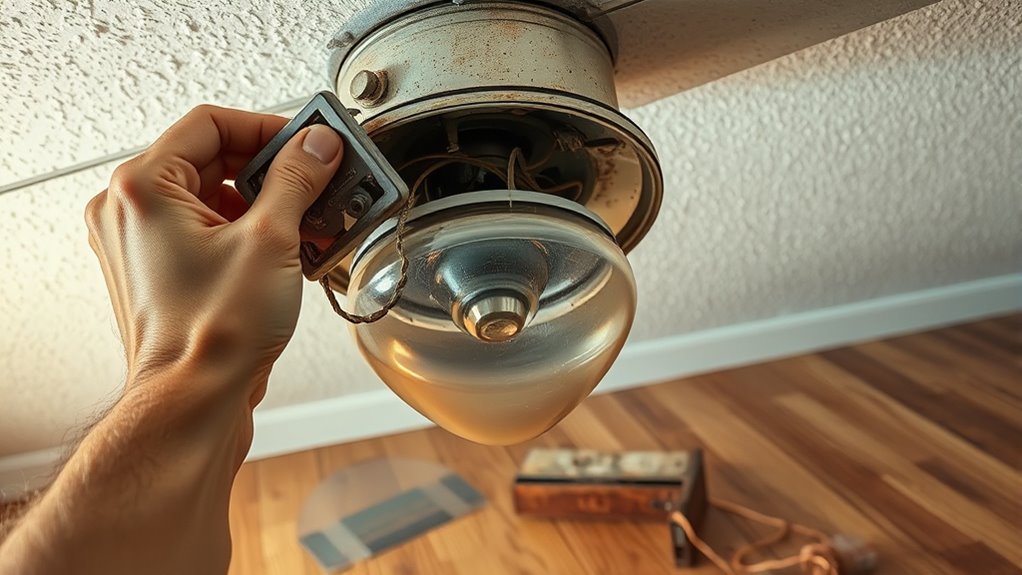
Removing an old light fixture requires careful preparation and adherence to safety procedures. Before beginning, confirm the power to the fixture’s circuit is completely shut off at the main breaker. Use a circuit tester to verify there is no voltage present on the fixture wires. This step is critical to prevent electrical shock or injury during removal. Gather all necessary tools, including a ladder, screwdriver, wire strippers, and possibly pliers. Wearing rubber-soled shoes and using insulated tools further enhances safety.
Always turn off power at the breaker and verify with a tester before removing a light fixture.
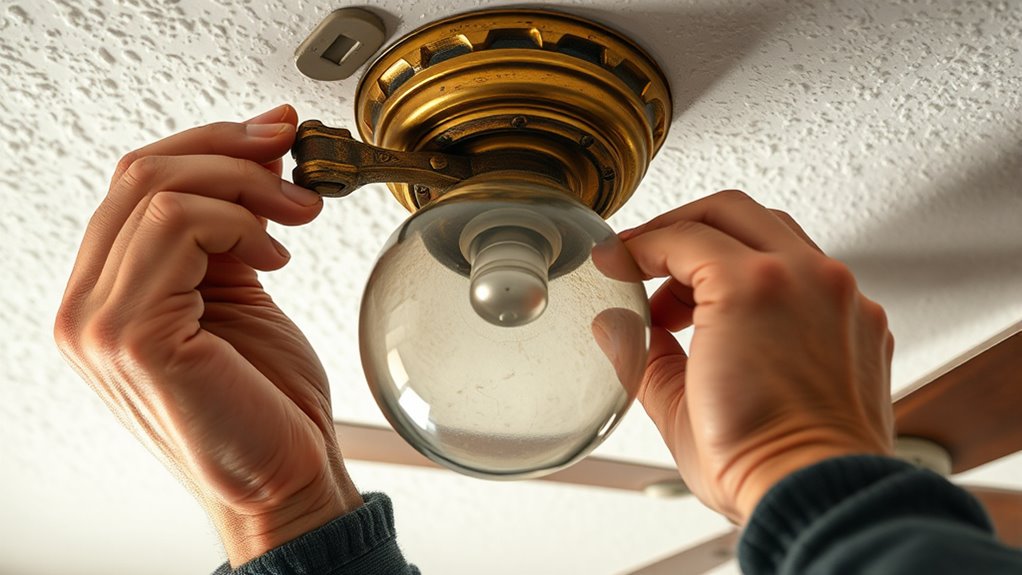
Start by positioning the ladder securely beneath the fixture, ensuring it is stable and on a flat surface. Climb carefully and support the fixture with one hand while loosening mounting screws or nuts with the appropriate screwdriver or socket wrench. Most fixtures are secured to a mounting bracket attached to the electrical box; remove these fasteners carefully. As you detach the fixture, support its weight to prevent it from falling suddenly, which could damage the fixture or cause injury.
Once the fixture is free, gently lower it and disconnect the wiring. Typically, the fixture wires are connected to the house wiring via wire nuts. Carefully unscrew or disconnect these wire nuts, taking note of the wiring configuration for future reference. Usually, the wires include a hot (black or red), neutral (white), and ground (green or copper). If your fixture has multiple wires, separate them gently to avoid damage. Do not pull on the wires directly; instead, hold the wire nuts or the wires close to the connection point to prevent stress on the wiring.
Inspect the electrical box after removal to confirm it is secure and free of debris or dust. If the box appears damaged or unstable, it must be replaced or reinforced before installing a ceiling fan. Clean the area around the box and prepare it for the new fixture or ceiling fan mounting bracket. If the old fixture’s wiring is frayed or damaged, trim the wires to a safe length, strip the insulation carefully, and prepare them for the upcoming installation. Additionally, ensure the electrical box is rated for ceiling fans, which often require a heavy-duty support.
Throughout this process, maintain a systematic approach, verifying each step before proceeding. Properly disposing of or storing the old fixture prevents clutter and potential hazards. Remember, the safety of your electrical system depends on meticulous attention to detail, correct handling of wiring, and adherence to electrical codes. Only after confirming the power is off and the fixture is disconnected should you proceed with installing the ceiling fan. This disciplined approach ensures a safe, code-compliant, and efficient transition from old fixture removal to new fixture installation.

Klein Tools RT250 GFCI Outlet Tester with LCD Display, Electric Voltage Tester for Standard 3-Wire 120V Electrical Receptacles
CLEAR LCD READOUT: GFCI Receptacle Tester features a large backlit LCD readout for easy voltage reading and clear…
As an affiliate, we earn on qualifying purchases.
As an affiliate, we earn on qualifying purchases.
Frequently Asked Questions
Do I Need an Electrician to Remove the Old Fixture?
Yes, you should hire an electrician to remove the old fixture if you’re unsure about handling electrical components safely. An electrician has the expertise to disconnect wiring properly, ensuring your safety and compliance with electrical codes. Attempting removal without proper knowledge can lead to electric shock or damage to your home’s wiring. For safety and proper installation, professional assistance is recommended, especially if you’re unfamiliar with electrical systems.
How Do I Turn off Power Safely Before Removal?
You must shut off power at the main circuit breaker to guarantee safety during fixture removal. Visualize flipping a massive, heavy switch that disconnects electricity from your entire room—this is your main breaker. Locate the breaker labeled for your lighting circuit, then switch it to the OFF position. Confirm power is off by testing with a voltage tester or a non-contact tester on the fixture wires before proceeding.
Can I Remove the Fixture if I See Exposed Wiring?
You should not remove the fixture if you see exposed wiring; it indicates a potential electrical hazard. First, verify the power is turned off at the circuit breaker. Use insulated tools and wear protective gear. Carefully disconnect the fixture, handling exposed wires with caution. If you’re unsure or uncomfortable, consult a licensed electrician to safely complete the removal and prevent electrical shock or fire risks.
What Tools Are Required for Fixture Removal?
Imagine replacing a ceiling fixture in your living room; you’ll need a Phillips screwdriver to unscrew mounting brackets, a pair of needle-nose pliers to disconnect wires, and possibly a voltage tester to confirm power is off. These tools guarantee safe, precise removal. Always turn off the circuit breaker first. Using the correct tools prevents damage to wiring and fixtures, ensuring a secure, professional installation of your ceiling fan.
How Long Does It Typically Take to Remove an Old Fixture?
It typically takes about 15 to 30 minutes to remove an old fixture, depending on its complexity and mounting method. You should start by turning off the power at the breaker, then carefully disconnect the fixture from the ceiling, removing screws and electrical connections as needed. Use appropriate tools to avoid damaging the fixture or ceiling. Proceed methodically to guarantee safety and efficiency throughout the removal process.

Klein Tools 85076INS Insulated Screwdriver Set, Made in USA, features 1000V Electricial Screwdrivers, (3) Phillips and (2) Slotted and Square Tips, 6-Piece
INSULATED SCREWDRIVER SET: Includes 1/4-Inch Slotted and #2 Phillips in 4-Inch round shanks plus #2 Square, #1, #2…
As an affiliate, we earn on qualifying purchases.
As an affiliate, we earn on qualifying purchases.
Conclusion
Once you’ve safely disconnected the old fixture, turned off the power, and removed the mounting hardware, you’re prepared to install the ceiling fan. Clear the work area, double-check your connections, and follow the manufacturer’s instructions meticulously. Ensuring proper grounding, secure mounting, and correct wiring guarantees safety and functionality. Removing an old fixture is a critical step that sets the foundation for a successful ceiling fan installation—precision, caution, and attention to detail are essential to achieve ideal results.

WGGE WG-015 Professional 8-inch Wire Stripper/Crimping Tool, Cable Cutter/Crimper, Wiring and Multi-Function Hand Tool, Red With Black
✅ 8 inch Professional Wire Stripper: Cuts, strips wire and loops 10-22 AWG Solid copper wire or aluminum…
As an affiliate, we earn on qualifying purchases.
As an affiliate, we earn on qualifying purchases.

Gardner Bender Outlet Box Solutions Kit (BSK-100)
Assortment of required products for both pros and DIYers to properly complete wiring device installation
As an affiliate, we earn on qualifying purchases.
As an affiliate, we earn on qualifying purchases.