To safely mount a ceiling fan on a sloped ceiling, start by measuring the angle and height to guarantee compatibility. Turn off power, clear your workspace, and install a sturdy mounting bracket suited for angled surfaces, using proper hardware like toggle bolts or lag screws. Connect the wiring correctly, secure the fan components tightly, and test the unit for stability and proper function. For detailed steps and tips, keep exploring how to make your installation safe and effective.
Key Takeaways
- Measure and confirm ceiling slope angle to select appropriate mounting hardware for stability.
- Use adjustable mounting brackets and shims to ensure level alignment on angled ceilings.
- Secure the mounting bracket firmly with suitable hardware like toggle bolts or lag screws for sloped surfaces.
- Connect wiring carefully, matching color codes and grounding the fan properly before final assembly.
- Test the fan’s stability and operation thoroughly to prevent wobbling, noise, and ensure safety.

addlon Ceiling Fans with Lights, 42 Inch Low Profile Ceiling Fan with Light and Remote Control, Flush Mount, Reversible, 3CCT, Dimmable, Quiet, Black Small Ceiling Fan for Bedroom Indoor/Outdoor Use
Ceiling Fan with Light: Bring more than just wind and light, but comfort! addlon modern ceiling fan, with...
As an affiliate, we earn on qualifying purchases.
Assessing Your Ceiling and Choosing the Right Fan

Before selecting a ceiling fan for your sloped ceiling, you need to carefully assess the angle and height of your ceiling. This helps determine the right ceiling fan styles and mounting options. If your ceiling has a steep slope, look for fans specifically designed for angled installation, such as angled or vaulted ceiling fans. These fans often come with adjustable angled mounts to ensure proper alignment and airflow. Consider the ceiling slope considerations to choose a fan that fits securely and operates efficiently. Measure the height from the floor to the ceiling, especially if you plan to hang the fan lower for better circulation. Picking the right fan based on these factors ensures safety, ideal performance, and a cohesive look in your space. Additionally, understanding the bedroom design style can help you select a fan that complements your decor and creates a harmonious environment. It’s also helpful to be aware of support hours in case you need assistance with installation or troubleshooting. For optimal safety and functionality, consider the unique and wicked planters that can be used to enhance your living space aesthetically while ensuring proper airflow and ventilation.

Amico Ceiling Fans with Lights, 42 inch Low Profile Ceiling fan with Light and Remote Control, Flush Mount, Reversible, 3CCT, Dimmable, Noiseless, Black Ceiling Fan for Bedroom, Indoor/Outdoor Use
Ceiling Fan with Light: Decorate your home with Amico ceiling fan! While bringing you coolness and comfort, it...
As an affiliate, we earn on qualifying purchases.
Gathering Essential Tools and Materials

To safely mount a ceiling fan on a sloped ceiling, you need to gather the right tools and materials beforehand. Start with essential power tools like a drill, screwdriver, and possibly a ladder to reach high ceilings. You’ll also need mounting brackets, screws, and wire connectors suited for ceiling fans. Don’t forget safety gear—wear goggles to protect your eyes, gloves for grip and safety, and a dust mask if needed. Having a sturdy, adjustable ladder ensures stability on uneven surfaces. Double-check that you have all parts before beginning to avoid interruptions. Using the right tools and safety gear helps you work efficiently while minimizing risks. Preparing thoroughly makes the installation smoother and safer, especially on a sloped ceiling. Additionally, understanding AI ethics jobs can be valuable if you plan to incorporate smart technology or automation into your home projects. For optimal results, consider projector placement strategies to ensure proper fan clearance and airflow around the fixture. Being aware of remote work productivity benefits can also help you plan your workspace setup for DIY projects at home.

ZMISHIBO 52 Inch Ceiling Fan with Light, App&Remote Control, Flush Mount Low Profile, Dimmable 20W LED Light, Quiet Reversible Motor for Bedroom, Living Room, Apartment, Black
Perfect Size for Rooms: This 52-inch ceiling fan is ideal for cooling and illuminating spacious areas like living...
As an affiliate, we earn on qualifying purchases.
Measuring the Slope and Planning the Installation

Accurately measuring the slope of your ceiling is essential to guarantee your fan is installed safely and functions properly. Begin by using a level with an angle measurement feature or a protractor to determine the exact slope. To calculate the slope, measure the vertical drop over a specific distance from the highest point of the ceiling. This enables precise slope calculation, helping you choose the right mounting bracket or extension arm. Record the angle measurement to make certain compatibility with your ceiling fan’s mounting options. Proper planning based on these measurements ensures your fan hangs correctly, avoids wobbling, and operates efficiently. Taking the time to accurately assess the slope pays off by preventing installation issues and ensuring long-term safety. Understanding Unique and Wicked Planters can also inspire creative solutions for integrating fans into decorative outdoor or indoor spaces. Additionally, knowing the signs of spoilage for lemon juice can help you store and use fresh ingredients safely when preparing your favorite beverages or recipes. Being aware of safety precautions for electrical installations further guarantees a secure and successful fan mounting process.

Forrovenco Ceiling Fans with Lights and Remote, 52 Inch Outdoor Ceiling Fan for Patios Indoor with 3 Downrods, 3 Blades Modern Ceiling Fan, 6 Speed Reversible Quiet DC Motor Solid Wood Fan,52in,Walnut
Modern Ceiling Fan with Light: Our 3 blade ceiling fan with light features unique, planet-friendly, and renewable high-quality...
As an affiliate, we earn on qualifying purchases.
Turning Off Power and Preparing the Workspace

Before starting your installation, make sure to turn off the circuit breaker to cut power completely. Clear the workspace to guarantee you have enough room and to avoid accidents. This step keeps you safe and prepares you for the mounting process. Additionally, understanding the importance of home security systems can help you appreciate the value of safety measures during any home improvement project. Familiarizing yourself with circuit breaker safety ensures you handle electrical components properly and avoid potential hazards.
Turn Off Circuit Breaker
Have you ever wondered what could happen if you work on electrical fixtures without shutting off the power? To guarantee electrical safety, you must turn off the circuit breaker before starting. Visualize this:
- Flipping the switch—cutting power to the entire room.
- Hearing a click—signaling the circuit is now dead.
- Feeling confident—knowing you’re protected from electrical shocks.
Clear Workspace Area
To guarantee a safe and efficient installation, start by clearing your workspace of any clutter or obstacles. Remove decorative accessories, such as picture frames or furniture, that could hinder your movement. Ensure the area beneath the ceiling is free of tools, boxes, and other items to prevent accidents. If you’re installing a ceiling fan outdoors, check for outdoor compatibility and secure the space against weather elements. Adequate lighting helps you see clearly and work safely. Keeping the workspace tidy reduces the risk of damaging existing fixtures or the fan itself. Remember, a clean, organized area makes it easier to access wiring and mounting points, ensuring a smoother, safer installation process. Additionally, understanding the sloped ceiling angle and how it affects mounting can help you select the appropriate hardware and brackets for a secure fit. Recognizing the astrological signs associated with certain traits may also inspire creative approaches to your project. Incorporating mental focus techniques can further improve safety and precision during installation.
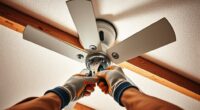
Installing the Mounting Bracket on the Sloped Ceiling

Start by marking the exact spot where you’ll install the mounting bracket, ensuring it’s level and centered. Then, securely attach the bracket to the ceiling, making sure it’s firmly fastened to support the fan’s weight. Proper placement and securement are key to a safe and stable ceiling fan installation. Additionally, consider the air quality benefits of proper installation, as a secure mount helps prevent wobbling and noise that can affect indoor air comfort. Using the correct mounting hardware designed for sloped ceilings enhances stability and safety. Incorporating appropriate support ensures the bracket can handle the fan’s weight, especially on angled surfaces.
Marking the Mounting Point
Before attaching the mounting bracket, you need to accurately mark where it will be installed on the sloped ceiling. Start by measuring the slope to understand how it affects the mounting angle. Next, determine the ideal marking placement by considering the fan’s weight and guaranteeing proper clearance. To do this, imagine: 1. Using a level or angle finder to measure the slope precisely. 2. Marking a point where the bracket will sit, aligned with your measurements. 3. Confirming the marking is level relative to the ceiling’s slope, not just flat. This step ensures your fan will hang correctly and safely. Accurate measuring slope and marking placement are vital for a secure, level installation on a sloped ceiling. Additionally, consulting professional guidelines can provide further safety and installation tips tailored for sloped ceilings. Ensuring the mounting hardware is rated for sloped ceiling installation reduces the risk of accidents or damage. Properly understanding angle measurement techniques can also help improve the accuracy of your markings.
Securing the Bracket Properly
Securing the mounting bracket on a sloped ceiling requires careful attention to guarantee stability. First, verify that the bracket aligns correctly with the marked spot. Use securing fasteners appropriate for your ceiling material, such as toggle bolts or lag screws, to firmly attach the bracket. Tighten the fasteners securely without over-tightening, which could damage the ceiling or the bracket. Check that the bracket is level and stable before proceeding. If needed, use shims to create a flat surface for the bracket, ensuring it won’t wobble or shift. Properly securing the mounting bracket is essential for safely supporting the weight of the ceiling fan, especially on a sloped surface. Take your time to double-check each fastener’s tightness for a secure, safe installation.
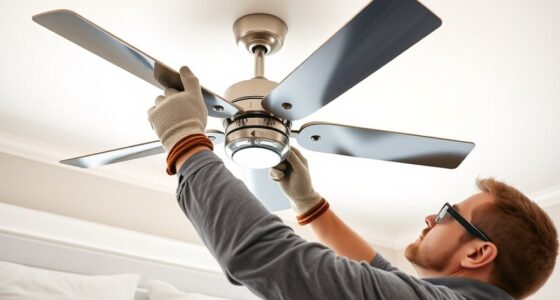
Assembling the Ceiling Fan Components

Assembling the ceiling fan components is a straightforward process that sets the foundation for safe and effective installation. First, you’ll connect the fan blades, carefully aligning each blade with its bracket and securing it with screws. Imagine attaching four or five blades, each one adding to the fan’s balance and airflow. Second, you’ll install the remote control receiver inside the fan housing, ensuring it’s positioned for easy access and proper signal reception. Third, you’ll attach the canopy or mounting cover, which hides the wiring and mounting hardware, completing the look. As you assemble, double-check that all screws are tight and components are secure, so the fan operates smoothly and safely on your sloped ceiling. Understanding the arcade machine mechanics can help you troubleshoot any issues that may arise during installation. Additionally, being familiar with sound healing principles can assist in creating a calmer environment if you choose to incorporate it into your space.
Securing the Fan to the Mounting Bracket

To guarantee your ceiling fan stays firmly in place, you need to securely attach it to the mounting bracket. Proper attachment prevents balance issues that can cause wobbling or excessive noise. Make sure the fan’s mounting arm is aligned correctly with the bracket, matching the fan blade orientation for smooth operation. Tighten all screws securely, but avoid over-tightening, which can damage components. Check that the fan is level after mounting; misalignment can lead to uneven fan blade alignment, causing wobbling or strain on the motor. If you notice any imbalance, adjust the screws or reposition the mounting bracket as needed. Ensuring the self-watering plant pots connection is stable and secure helps prevent unnecessary strain on the fan components. A stable, well-secured connection ensures safe operation and helps your fan run quietly and efficiently.
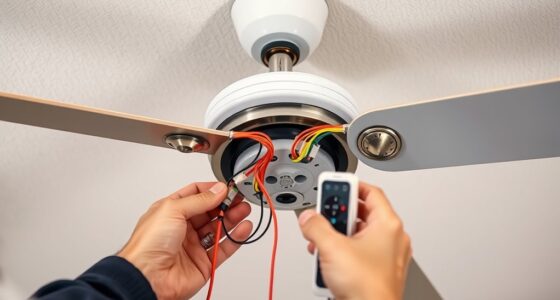
Wiring and Connecting the Fan Safely

Before you connect the wiring, turn off the power at the circuit breaker to guarantee safety. Once done, follow these steps:
- Match wire color codes—typically black or red for hot, white for neutral, and green or bare copper for grounding.
- Ensure grounding requirements are met by attaching the grounding wire securely to the grounding screw on the fan and mounting bracket.
- Use wire connectors to join the corresponding wires, twisting them tightly to prevent loose connections.
Check that all connections are secure and insulated, then carefully tuck the wires into the ceiling box. Remember, proper grounding and adherence to wire color codes are essential for safe operation and to prevent electrical hazards.
Final Checks and Testing the Installed Ceiling Fan

Once you’ve completed the installation, it’s essential to perform final checks and test the ceiling fan to guarantee it operates safely and smoothly. Start by testing the remote control setup, ensuring you can turn the fan on and off, adjust speed, and change settings comfortably. Check for wobbling by observing fan blade balancing; if the fan wobbles, adjust the blades accordingly. Confirm all mounting hardware is tight and secure. Turn the fan on at different speeds, listening for unusual noises. Verify that the fan’s movement is smooth and stable. Use the table below to evoke confidence and peace of mind during your final review:
| Confidence | Peace of Mind |
|---|---|
| Everything is secure | Safe for everyday use |
| No wobbling or noise | Reliable performance |
| Remote works perfectly | Comfort in every breeze |
Frequently Asked Questions
Can I Install a Ceiling Fan Without Professional Help?
You can attempt a DIY installation of a ceiling fan, but you need to prioritize electrical safety. If you’re comfortable working with electrical wiring and have the right tools, it’s possible to install it yourself. However, for sloped ceilings, you’ll need special mounting hardware and extra caution. If you’re unsure or inexperienced, it’s safer to employ a professional to ensure proper installation and avoid electrical hazards.
What Safety Precautions Should I Take During Installation?
When installing a ceiling fan, prioritize ladder safety by ensuring it’s stable and on an even surface. Always turn off the power at the breaker to avoid electrical safety hazards, and double-check that the circuit is dead before working. Use insulated tools and handle wiring carefully. Don’t rush—take your time and follow instructions closely to prevent accidents or damage. Your safety depends on careful preparation and attentive installation.
How Do I Troubleshoot if the Fan Wobbles After Installation?
Imagine a spinning top losing its perfect balance—that’s what a fan wobble feels like. To troubleshoot, first check for loose screws or blades. Use balancing tips like adjusting blade weights or repositioning blades if needed. Confirm the fan is securely mounted and the downrod is straight. These steps help stabilize your fan, preventing wobbling and keeping your space safe and comfortable.
Are Special Mounting Brackets Needed for Sloped Ceilings?
For sloped ceilings, you’ll need special sloped ceiling brackets to guarantee proper mounting. These brackets help you achieve the correct fan angle adjustment, preventing wobbling and ensuring safe operation. Without them, the fan may hang at an awkward angle, causing noise or instability. Make sure to select brackets compatible with your ceiling’s pitch, and follow the manufacturer’s instructions for installation to keep your fan secure and balanced.
How Do I Maintain the Fan’S Balance Over Time?
Think of your ceiling fan as a delicate dance partner—you want every move smooth and balanced. To keep it that way, regularly check the fan blade alignment and use balancing accessories when needed. If you notice wobbling, stop the fan, adjust the blades gently, and add balancing weights. Maintaining this rhythm guarantees your fan spins quietly and safely, keeping your cool air flowing perfectly over time.
Conclusion
Just like a skilled sailor adjusting to unpredictable seas, you’ve navigated the twists of a sloped ceiling to securely mount your fan. With patience and attention, you’ve transformed a challenge into a smooth, steady breeze. Now, your space is ready to refresh and comfort, much like a gentle wind guiding a ship to calmer waters. Trust your efforts—your ceiling fan is now both safe and perfectly positioned to keep things cool.