Installing a ceiling fan in a vaulted ceiling requires choosing the right-sized fan, typically 52 inches or more, and using a long downrod for proper reach. Make sure you assess ceiling height, structural support, and electrical wiring beforehand. Use the correct mounting hardware suited for sloped ceilings and confirm balanced blades to avoid wobbling. Regular maintenance keeps your fan running smoothly. For more tips on a safe, efficient setup, keep exploring this guide.
Key Takeaways
- Measure ceiling height and slope accurately to select appropriate fan size, downrod length, and mounting hardware for optimal airflow.
- Ensure ceiling structural support is sufficient; reinforce joists or use specialized mounting brackets for safety and stability.
- Use slope adapters or angled mounts to securely install fans on vaulted ceilings with varying angles.
- Verify electrical wiring capacity and follow local codes, possibly consulting professionals for complex or high-voltage setups.
- Regularly clean blades, tighten connections, and balance the fan to maintain efficiency and prolong lifespan.

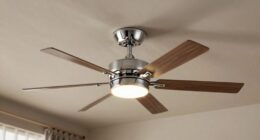
Modern Ceiling Fans with Lights – 52 inch Outdoor White Ceiling Fan with Light and Remote, Reversible DC Motor, 6-Speed Quiet 3CCT LED Dimmable for Bedroom, Indoor and Outdoor, Patios , ETL Listed
✅▶WHY CHOOSE WELLSPEED CEILING FAN◀ Wellspeed ceiling fans cooperation factory has been making fan light for more than…
As an affiliate, we earn on qualifying purchases.
As an affiliate, we earn on qualifying purchases.
Choosing the Right Fan Size and Style for Vaulted Ceilings

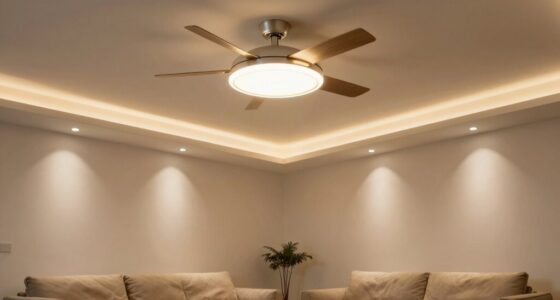
When choosing a ceiling fan for vaulted ceilings, it’s important to take into account both size and style to guarantee proper airflow and aesthetic harmony. Choosing fan style depends on your room decor—whether you prefer modern, rustic, or traditional looks. For vaulted ceilings, size considerations are vital; you need a fan with a longer downrod to reach the living space comfortably. Typically, larger fans with blades 52 inches or more are ideal for high ceilings, ensuring effective circulation. Avoid small fans that look out of proportion or fail to move enough air. Selecting the right size and style ensures your fan complements your space while providing efficient ventilation. Remember, a well-chosen fan enhances comfort and adds a stylish touch to your vaulted ceiling. Additionally, considering the use of unique and wicked planters can add artistic flair and sustainability to your home decor, complementing your ceiling fan choices.

Mosanfan Black Sloped Ceiling Fan Adapter for Sloped & Vaulted Ceilings Up to 45°
Usage scenario: suitable for flat and sloping ceilings
As an affiliate, we earn on qualifying purchases.
As an affiliate, we earn on qualifying purchases.
Properly Assessing Ceiling Height and Structural Support

Before installing a ceiling fan in a vaulted space, you need to measure the ceiling clearance to guarantee proper airflow and safety. Next, assess the structural integrity to confirm the ceiling can support the fan’s weight and movement. Finally, evaluate your support options to determine the best way to secure the fan securely and safely. Incorporating appropriate projector technology can also enhance the overall environment, especially if you plan to use the space for multimedia purposes.
Measuring Ceiling Clearances
Accurately measuring your ceiling clearances is essential to ensure your vaulted fan fits safely and functions properly. Begin by checking your ceiling height to determine the available space for installation. Use a tape measure to perform a clearance measurement from the ceiling to the floor, noting any slopes or angles in the vaulted ceiling. Pay close attention to the height at the highest point of the ceiling, as this impacts fan size and mounting options. Make sure to account for any structural elements or beams that could interfere with the fan’s placement. Proper clearance measurement helps prevent safety hazards and guarantees ideal airflow. Remember, the goal is to leave enough space for the fan blades to spin freely while maintaining safe distances from walls or other fixtures. Additionally, understanding Ford Tuning principles can help optimize your fan system’s performance and longevity.
Analyzing Structural Integrity
To guarantee your vaulted ceiling fan is both safe and effective, you need to properly assess the ceiling’s structural integrity. Start with a load bearing analysis to identify if the existing support can handle the fan’s weight. Check for signs of structural reinforcement needs, like sagging or cracks. You should also verify the joists or beams are strong enough to support the fan’s mounting hardware. Consider consulting a professional if you’re unsure about the support system. Key steps include:
- Inspecting load-bearing elements for damage or weakness
- Evaluating if additional structural reinforcement is necessary
- Confirming the support system can sustain the fan’s weight safely
- Remember that home furnishings components like ceiling fans must be installed with proper support to ensure safety and longevity.
Doing this ensures your installation is secure, preventing accidents and ensuring long-term functionality.
Evaluating Support Options
Evaluating support options begins with properly gauging your ceiling’s height and the existing structural framework. Measure the ceiling height accurately to determine if additional support is necessary for your fan. For vaulted ceilings, support options might include installing a supportive brace or ceiling reinforcement to guarantee stability. Check the joists and rafters to verify their strength and placement, as they’re vital for secure mounting. If the structure isn’t sufficient, you’ll need to reinforce it with proper support options like cross beams or specialized mounting brackets. Proper ceiling reinforcement not only guarantees safety but also prevents sagging or damage over time. Additionally, understanding AI-driven security systems can help you select the best safety features for your home. Taking the time to assess these factors now will save you hassle during installation and keep your fan running smoothly.

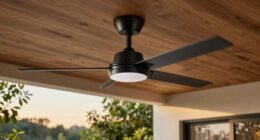
Dolavast 52 Inch Ceiling Fan with Lights and Remote, Downrod Mount, Sloped Ceiling Compatible up to 15°, Quiet Reversible DC Motor, 3CCT Dimmable LED, Black Ceiling Fan for Bedroom Living Room
Smart APP & Remote Control: Control this 52 inch ceiling fan with lights using the included remote or…
As an affiliate, we earn on qualifying purchases.
As an affiliate, we earn on qualifying purchases.
Essential Tools and Materials for a Safe Installation

Before starting, gather the essential tools and materials you’ll need for a safe installation. Make sure you have the right hand tools, compatible mounting brackets, and all necessary electrical supplies. Having everything on hand will make the process smoother and help guarantee a secure, safe setup. Additionally, choosing the best airless paint sprayer suitable for your project can ensure efficient and high-quality results.
Necessary Hand Tools
Having the right hand tools on hand is essential for a safe and efficient vaulted ceiling fan installation. Proper tools ensure you can handle decorative fan styles and achieve seamless color coordination with your room’s decor. Key tools include:
- Screwdrivers (both flat-head and Phillips) for securing mounting brackets and fan blades
- Pliers for gripping wires and tightening connections
- Voltage tester to ensure power is off before working on electrical components
- Proper lubrication of moving parts can help maintain the fan’s longevity and smooth operation over time
These tools help you work confidently, avoiding damage to delicate parts and ensuring safety. With the correct hand tools, you’ll be able to install your ceiling fan smoothly, whether it’s a modern design or a vintage-inspired piece. Having everything ready keeps the process efficient and reduces frustration, making your vaulted ceiling fan installation straightforward and safe.
Compatible Mounting Brackets
Choosing the right mounting brackets is essential for a secure and stable ceiling fan installation. Compatible mounting brackets ensure your fan stays firmly in place, especially with vaulted ceilings. Make sure to select brackets designed for your specific fan model and ceiling type. Ceiling fan adapters can help bridge the gap if your fan isn’t a perfect fit for existing brackets. These adapters provide extra support and accommodate different mounting configurations. Always verify that the brackets you choose can bear the weight of your fan and are rated for high ceilings. Properly matching compatible mounting brackets and ceiling fan adapters minimizes wobbling and enhances safety. Investing in the correct hardware now ensures a long-lasting, secure installation that keeps your space comfortable and safe. Additionally, understanding sector performance metrics can help you choose the best hardware options based on the latest industry standards.
Electrical Supplies Needed
To guarantee a safe and successful ceiling fan installation, you need to gather the proper electrical supplies. These tools ensure you can connect everything correctly and safely. Essential supplies include a voltage tester to confirm power is off, wire strippers for clean connections, and a sturdy ladder to reach the vaulted ceiling comfortably. If you want to maximize energy efficiency and convenience, consider installing wireless controls for easy operation. Additionally, ensure you have compatible wiring and connectors suited for your fan model. These supplies help you avoid common issues and achieve a smooth setup. With the right tools, you’ll confidently install your ceiling fan, enjoy quieter operation, and optimize energy savings. Proper electrical supplies are the foundation for a secure and efficient ceiling fan installation.

KALIONE Ceiling Fan Blade Balancing Kit Including Fan Balancing Clips and 12pcs Metal Self-Adhesive 3G Weight Practical Fan Balance Kit for Ceiling Fan Weight Balancing 4pcs
Package Content: You will receive 4 sets of fan balancing kit, enough quantity meets all your needs.
As an affiliate, we earn on qualifying purchases.
As an affiliate, we earn on qualifying purchases.
Understanding Electrical Wiring and Power Source Requirements

Before installing a vaulted ceiling fan, comprehending the electrical wiring and power source requirements is vital. Check if your existing circuit can handle the fan’s wattage, especially if you want to connect wireless controls for convenience. A dedicated circuit is ideal for maximizing energy efficiency and avoiding overloads. Make sure you have the correct wiring type, typically a neutral wire, live wire, and ground. If your home lacks a suitable power source in the ceiling, you might need to install a new circuit or upgrade your wiring. Using fans compatible with wireless controls can simplify operation and reduce unnecessary energy use. Always follow local electrical codes and consider consulting a professional if you’re unsure about wiring specifications or power capacity to guarantee safety and peak performance. Forsale 100
Optimal Mounting Techniques for Sloped and Vaulted Ceilings

Installing a fan on a sloped or vaulted ceiling requires careful attention to mounting techniques to guarantee safety and ideal airflow. To do this effectively:
Proper mounting ensures safety, level airflow, and optimal fan performance on sloped or vaulted ceilings.
- Use a slope adapter or angled ceiling mount to ensure the fan hangs level, which is essential for decorative lighting and proper operation.
- Secure the mounting bracket directly to a ceiling joist or use a ceiling box rated for sloped ceilings, ensuring stability despite ceiling insulation or insulation barriers.
- Verify the fan’s downrod length to maintain maximum clearance and air circulation, especially with vaulted ceilings that can affect airflow patterns.
- Additionally, selecting the appropriate essential oils can enhance the ambiance and air quality in your space, making your environment more comfortable and inviting.
Proper mounting helps prevent wobbling, protects electrical connections, and ensures your fan functions efficiently. Remember, a secure, level mount is key to enjoying the benefits of your ceiling fan and decorative lighting on vaulted ceilings.
Ventilation and Airflow Considerations for Better Efficiency

To maximize your ceiling fan’s efficiency, focus on ideal placement so it circulates air effectively throughout the space. Incorporating cross-ventilation strategies can help improve airflow and reduce hot or stagnant areas. Proper ventilation planning makes a noticeable difference in comfort and energy savings. Additionally, understanding how airflow dynamics influence fan performance can help optimize overall ventilation strategies.
Optimal Fan Placement
Proper fan placement is essential for maximizing ventilation and airflow efficiency in a vaulted ceiling. To get the best results, position the fan so it circulates air evenly across the room, avoiding dead spots. Consider these key factors:
- Make certain lighting placement doesn’t interfere with fan blades or airflow.
- Install the fan at a height where it can push air downward without hitting the ceiling or walls.
- Choose a fan with remote control compatibility for easier adjustments without climbing ladders.
Cross-Ventilation Strategies
Strategically creating cross-ventilation can considerably improve airflow in rooms with vaulted ceilings. By positioning windows and fans to facilitate cross breezes, you enhance airflow circulation, reducing hot spots and stale air. To visualize, imagine opening windows on opposite sides of the room, allowing fresh air to sweep through naturally. Here’s a simple layout:
| Window Placement | Fan Placement |
|---|---|
| Opposite sides | Near the ceiling’s high point |
| Upper & lower | Aim to direct airflow across the room |
| Openings on different walls | Facilitates continuous cross breezes |
| Air intake on one side | Exhaust on the opposite side |
| Strategic positioning | Maximizes fresh air flow and efficiency |
This setup promotes better ventilation, making your vaulted ceiling space more comfortable and energy-efficient. Incorporating automation technologies can optimize fan operation and airflow management for even better efficiency.
Balancing Aesthetics With Functionality During Installation

While focusing on the visual appeal of your vaulted ceiling fan, it’s essential to guarantee it also functions well and enhances the room’s comfort. Balance aesthetic choices with practical considerations by selecting fans that complement your decor through decorative accents and color coordination. To achieve this, consider the fan’s blade finish, which should match or subtly contrast with your ceiling’s hue. Opt for a design that enhances the room’s style without overpowering it. Keep these tips in mind:
Choose a ceiling fan that balances style and function with complementary colors and decorative accents.
- Use decorative accents like finials or light fixtures to tie the fan into your decor
- Choose a fan color that complements your ceiling or wall colors
- Ensure the fan’s style aligns with the room’s overall design aesthetic
This approach guarantees your vaulted ceiling fan is both beautiful and functional.
Troubleshooting Common Challenges in Vaulted Ceiling Fan Setup

Setting up a vaulted ceiling fan can present unique challenges, but understanding common issues can help you troubleshoot effectively. One frequent problem is fan blade alignment; uneven blades can cause wobbling and noise. To fix this, carefully check each blade’s position and tighten all screws evenly. Another challenge is remote control compatibility—ensure your remote is compatible with your fan model and that batteries are fresh. If the remote isn’t responding, try resetting the receiver or re-pairing it with the remote. Also, verify that the remote’s frequency matches the fan’s receiver. Addressing these issues early prevents long-term damage and guarantees smooth operation. Proper ventilation is essential for the optimal functioning of your fan and overall room comfort. With patience and attention to detail, you can resolve these common setup challenges and enjoy your vaulted ceiling fan fully functional.
Safety Precautions and Best Practices for DIY Installations

Before starting your DIY vaulted ceiling fan installation, guaranteeing safety is vital to prevent accidents and damage. Follow these best practices:
- Always prioritize ladder safety by securing it properly and maintaining three points of contact.
- Familiarize yourself with local electrical codes to guarantee your installation is compliant and safe.
- Turn off the circuit breaker before working on electrical connections to avoid shocks or electrocution.
- Incorporating automation’s role in business intelligence can help you plan and execute your installation more efficiently, ensuring accurate measurements and reducing the risk of errors.
Maintaining and Adjusting Your Ceiling Fan for Longevity

Once your ceiling fan is installed safely, keeping it well-maintained guarantees it runs efficiently and lasts longer. Regular fan blade maintenance is key—clean dust and debris to prevent wobbling and noise, which can cause wear over time. Check for loose screws or connections and tighten them as needed. If your fan has a remote control, troubleshoot it by replacing batteries or resetting the device to ensure smooth operation. Proper adjustments, like balancing the blades, can reduce strain on the motor and extend its lifespan. Avoid overusing the fan at high speeds constantly, as this accelerates wear. Additionally, understanding the types of ceiling fans and their benefits can help you choose the right fan for your needs. Consistent maintenance and timely troubleshooting help keep your ceiling fan functioning at its best, saving you money and ensuring cool comfort for years to come.
Frequently Asked Questions
Can I Install a Ceiling Fan Without Professional Help?
You can attempt a DIY installation if you’re comfortable with electrical work and basic tools. However, keep warranty considerations in mind; improper installation might void your ceiling fan’s warranty. Make sure to follow the manufacturer’s instructions carefully, turn off power at the circuit breaker, and double-check wiring connections. If you’re unsure or uncomfortable, it’s safer to hire a professional to avoid potential hazards and ensure proper functioning.
How Do I Control Fan Speed in Vaulted Ceilings?
You can control fan speed in vaulted ceilings easily using a remote control or wall switch. If your fan comes with a remote, simply press the speed buttons to adjust airflow. Alternatively, if it’s wired to a wall switch with a speed control feature, switch it on and toggle through the settings. Make sure your fan supports these controls beforehand for seamless operation and ideal ventilation.
Are There Specific Safety Standards for High Ceilings?
High ceilings are like towering skyscrapers of your home, so safety standards matter immensely. You need to follow specific safety regulations and high ceiling standards to prevent accidents. Make sure your fan is rated for high ceilings, use the right mounting hardware, and install safety chains if necessary. Always adhere to local codes and manufacturer instructions to keep your space safe and breezy, no matter how lofty it gets.
What Are Energy-Efficient Fan Options for Vaulted Spaces?
You should look for energy-saving options like fans with LED lights and variable speed controls to cut down energy use. Eco-friendly fans made from sustainable materials also help reduce your carbon footprint. Choose models with high airflow efficiency and low wattage to maximize cooling while minimizing energy consumption. Installing fans with reversible motor functions can help optimize heating and cooling, making your vaulted space more eco-friendly and cost-effective.
How Often Should I Clean and Maintain My Ceiling Fan?
You should clean your ceiling fan every 1 to 2 months, especially if dust accumulates quickly. Regular dusting prevents buildup and keeps air fresh. Don’t forget to check motor lubrication annually to guarantee smooth operation. When you maintain your fan consistently, you reduce strain on the motor, prolong its life, and keep your space comfortable. Skipping maintenance can lead to noisy operation and decreased efficiency over time.
Conclusion
Remember, “a stitch in time saves nine.” When installing your vaulted ceiling fan, taking the proper steps guarantees safety and longevity. Choose the right fan, assess your ceiling carefully, and don’t rush the process. With patience and attention to detail, you’ll enjoy improved ventilation and style in your space for years to come. Trust the process, and your effort will pay off in a well-functioning, beautiful addition to your home.