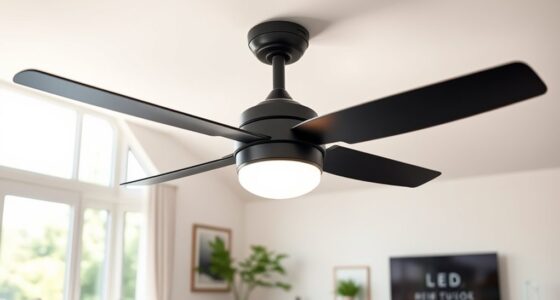

To safely wire a ceiling fan, start by turning off the power at the breaker and verifying no current with a voltage tester. Understand wiring color codes: black (hot), white (neutral), green or bare copper (ground), and blue or red (light or separate control). Connect wires securely with wire nuts and make certain the fixture is properly grounded. For complex setups like remote control or multiple switches, follow detailed wiring guides. Continuing will help you master safe installation and troubleshooting techniques.
Key Takeaways
- Always turn off power and verify no voltage before wiring to ensure safety.
- Identify and follow wiring color codes: black (hot), white (neutral), green/bare (ground), blue (light), red (additional hot).
- Use proper wire connectors and secure all connections tightly with wire nuts.
- Support the electrical box securely and mount the fan according to manufacturer instructions.
- Test all functions and check for wobbling or unusual noises before completing installation.

Harbor Breeze 54-in Ceiling Fan Wire Extension Cord
Downrod wire extension kit
As an affiliate, we earn on qualifying purchases.
As an affiliate, we earn on qualifying purchases.
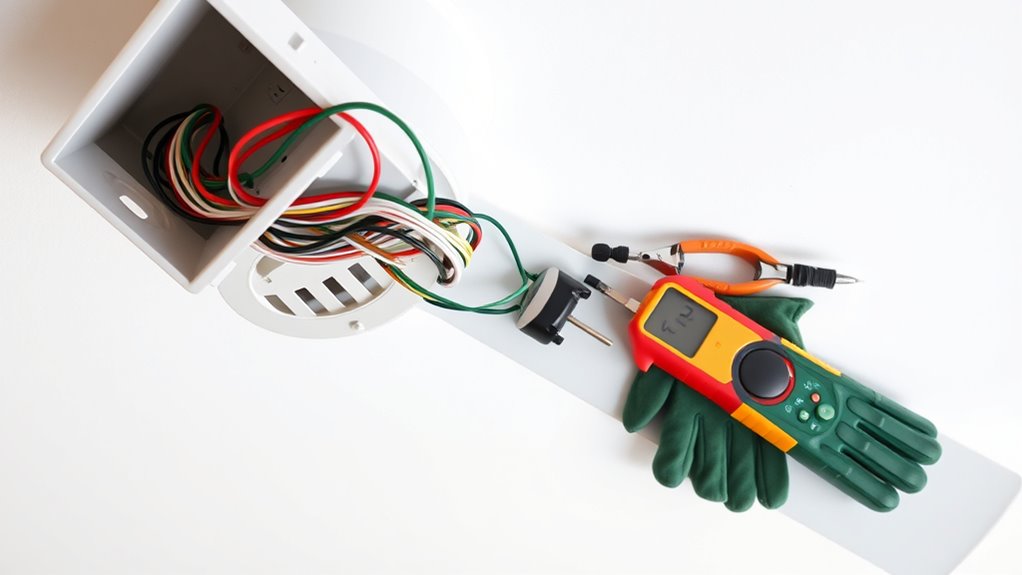
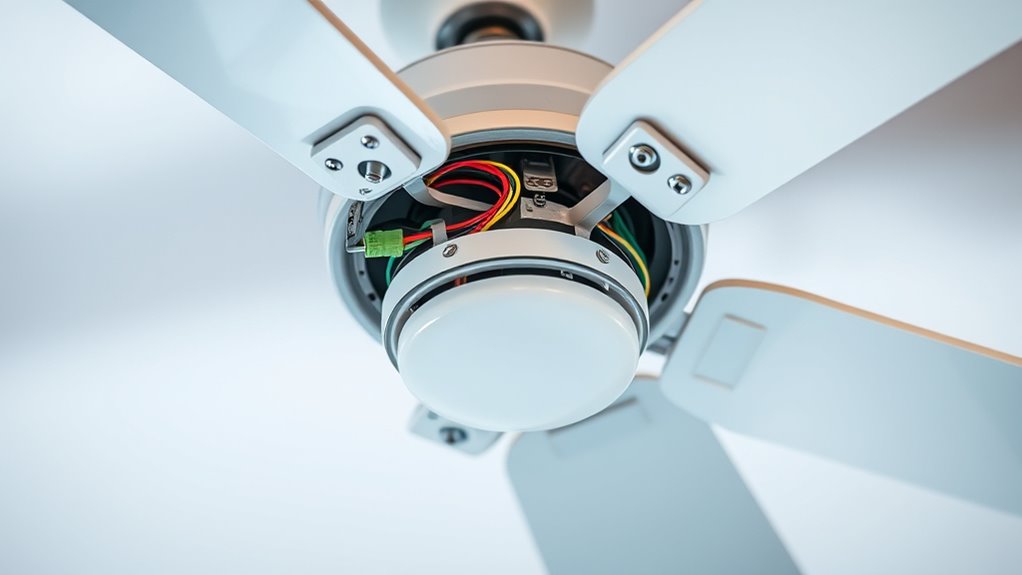
Understanding Ceiling Fan Wiring Color Codes

Understanding ceiling fan wiring color codes is essential for safe and correct installation. Typically, black wires are hot wires that supply power to the fan motor, while white wires serve as neutral wires completing the circuit. The ground wire, either green or bare copper, provides grounding for safety. Proper wiring practices are crucial to ensure the electrical system operates safely and efficiently. Additionally, understanding the horsepower of electric dirt bikes can help in choosing suitable electrical components and wiring setups for high-power fans or larger systems. Blue wires are used for light kits, connecting to a separate switch or control. Red wires are additional hot wires, allowing independent control of the fan and light, and connect to separate switches or remotes. Being familiar with color code standards helps prevent wiring errors and ensures compliance with electrical regulations. Knowing these wire color codes helps you identify circuit wiring and properly connect fan wiring. Always verify wire functions before installation, as color codes can vary. Accurate wiring identification ensures safe operation and prevents electrical hazards. Properly following electrical safety guidelines is vital during installation to avoid potential hazards.

Westinghouse 0110000 Saf-T-Brace for Ceiling Fans, 3 Teeth, Twist and Lock,Silver(Pack of 1)
Saf-T-Brace allows safe, simple installation of fans and fixtures
As an affiliate, we earn on qualifying purchases.
As an affiliate, we earn on qualifying purchases.
Preparing for Safe Ceiling Fan Installation

Before you start installing your ceiling fan, it’s crucial to prioritize safety by properly preparing your workspace. Turn off the circuit breaker and verify power is off with a voltage tester to prevent shocks. Make certain the electrical box is rated for ceiling fans and supports at least 70 pounds for stability. Gather tools like screwdrivers, wire strippers, and electrical tape. Review the wiring diagram and identify wiring connections, including the ground wire. Follow safety precautions to avoid hazards or damage. If unsure about wiring safety or connections, consider consulting a professional electrician. Proper preparation ensures a secure installation and peace of mind. Home security systems and their deterrent effects highlight the importance of safety measures during any home improvement project. Additionally, understanding the top projector features can help you choose the right equipment for your setup.

AITKEN 2PCS Universal Cooling Fan Connector Pigtail Harness, Alternator Wiring Repair Harness Plug Connector Compatible with SPAL Electric Fans, Thicker Wire, 12AWG, Wire Length 11.8 inches.
Matching with the Terminal Block: can quickly complete the wiring, safety and waterproof, and make the wiring harness…
As an affiliate, we earn on qualifying purchases.
As an affiliate, we earn on qualifying purchases.
Essential Tools and Materials for Wiring
To guarantee a safe and efficient ceiling fan wiring process, gather all the necessary tools and materials beforehand. You’ll need a voltage tester to confirm power is off, along with wire strippers and screwdrivers for handling electrical wires and mounting components. Use UL-listed wire connectors and wire nuts appropriate for your circuit’s gauge, such as 14-3 or 12-3. A circuit breaker or fuse box should be accessible to shut off power safely. A sturdy ladder ensures safe access to the ceiling. Don’t forget safety equipment like rubber gloves, safety glasses, and non-slip shoes to protect yourself. Having these tools and materials ready will streamline your wiring process and help you work safely and confidently. Incorporating power safety measures ensures that your work remains secure and reduces the risk of accidents during installation. Additionally, understanding electrical wiring standards can prevent common errors and ensure compliance with local codes. Being aware of proper grounding techniques can further enhance safety and protect your electrical system from faults. Furthermore, consulting manufacturer instructions can prevent installation errors and ensure proper setup. Being familiar with latest wiring regulations can also help you stay compliant with evolving safety standards.
LPHUMEX Universal Ceiling Fan Remote Control Kit, 3-in-1 AC Motor Ceiling Fan Light Timing & Speed Remote, for Hunter/Harbor Breeze/Westinghouse/Honeywell/Other Ceiling Fan lamp
☞Easy Installation – Installation of the Universal Ceiling Fan Remote Controls Kit is a breeze, and the looks…
As an affiliate, we earn on qualifying purchases.
As an affiliate, we earn on qualifying purchases.
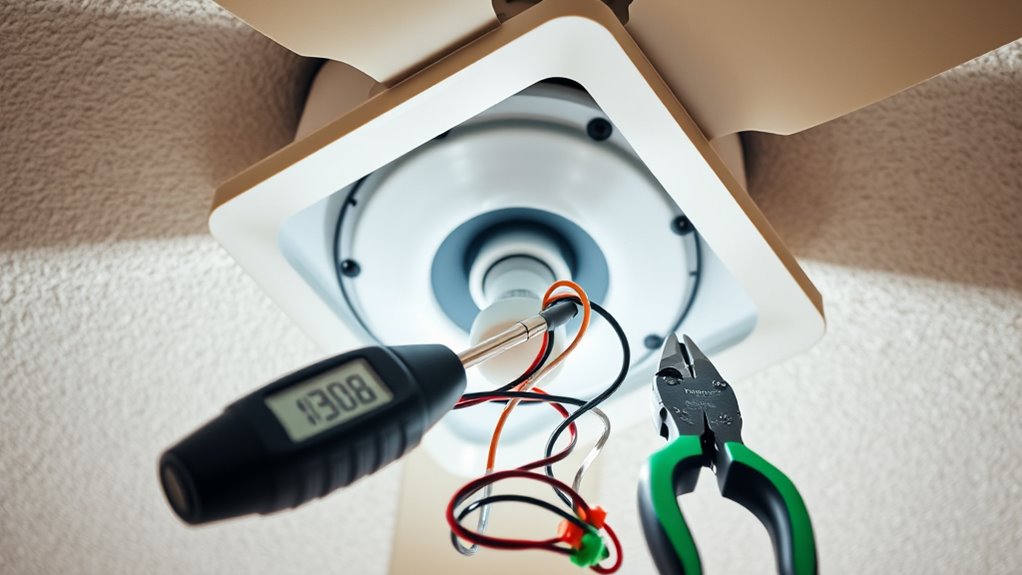
Turning Off Power and Verifying De-energization

Turning off the power before working on your ceiling fan is essential for safety. Start by switching off the circuit breaker controlling the fan circuit to prevent electrical shock. Use a non-contact voltage tester to confirm power off at the fixture and switch box—this guarantees no live current remains. Even if the switch is off, wires downstream could still carry voltage, so verifying de-energization is critical. Double-check with a voltage tester to identify any residual power, following all safety standards. This step helps you avoid safety hazards like electrical shock while handling wires. Additionally, understanding electrical safety protocols is vital to ensure proper precautions are taken during installation or repair. Recognizing the importance of proper testing can prevent accidents and ensure a safe working environment. Always remember to use appropriate tools, such as insulated screwdrivers and gloves, to further protect yourself during electrical work. Preventive measures such as using appropriate tools and protective gear further enhance safety during electrical work.
Connecting Wires Without Switches

When wiring a ceiling fan without switches, you need to connect the neutral and ground wires properly to guarantee safety and functionality. Join the white (neutral) wire from the fan to the household neutral, and secure the green (ground) wire to the house ground wire. Then, connect the fan’s power line directly to the ceiling’s hot wire for continuous operation. It is also important to ensure proper essential oil safety practices when handling electrical wiring to prevent accidents. Additionally, consulting YouGoNews resources can provide further guidance on electrical safety protocols, especially when understanding city dynamics and local regulations. Always verify that your wiring setup complies with local fire safety standards to prevent potential hazards. Incorporating remote work safety considerations can also help in planning electrical projects in home offices or unconventional spaces.
Neutral and Ground Connections
Connecting the neutral and ground wires without switches is straightforward if you follow proper safety procedures. First, shut off power and verify with a voltage tester to prevent shock. Use a wire nut to securely connect the neutral wire from the fan to the household white (neutral) wire, ensuring a solid neutral connection. The ground wire, usually green or bare copper, must be connected to the household ground wire for grounding safety. Tighten all wiring connections to avoid loose wire joints that could cause arcing. Proper wiring safety prevents hazards and maintains the electrical circuit’s integrity. Additionally, incorporating wall organization systems can help keep your wiring area tidy and accessible for future maintenance.
Power Line Integration
To integrate the power lines when wiring a ceiling fan without switches, you’ll need to connect the fan’s white (neutral) wire directly to the ceiling’s neutral wire and the black (hot) wire from the fan to the ceiling’s hot wire, which is typically black or red.
This creates a straightforward circuit connection, ensuring the power supply flows correctly to the fan.
Refer to your wiring diagram to confirm the correct wiring process.
Use a voltage tester to verify there’s no live current before working.
Secure all connections with wire nuts, twisting clockwise until tight, and cover exposed copper for safety.
Connect the grounding wire to the household grounding wire or terminal.
Carefully tuck wires into the electrical box, then restore power at the circuit breaker to test the fan.
Wiring a Fan With a Light and Pull Chain Control

Wiring a fan with a light and pull chain control involves making several key connections to guarantee proper operation and safety. First, turn off the circuit breaker and verify no voltage is present.
Next, connect the fan’s black wire to the ceiling’s hot wire and the blue wire to the light kit’s hot wire, using wire nuts for secure wire connections.
Then, join the white (neutral) wire from the fan to the ceiling’s neutral wire.
Finally, connect the green or bare copper ground wire to the ceiling’s grounding wire for safety.
Key steps include:
- Properly wiring the power supply to the fan and light kit.
- Ensuring pull chain control functions correctly.
- Using appropriate wiring methods for safety.
- Confirming the circuit breaker is off before starting.
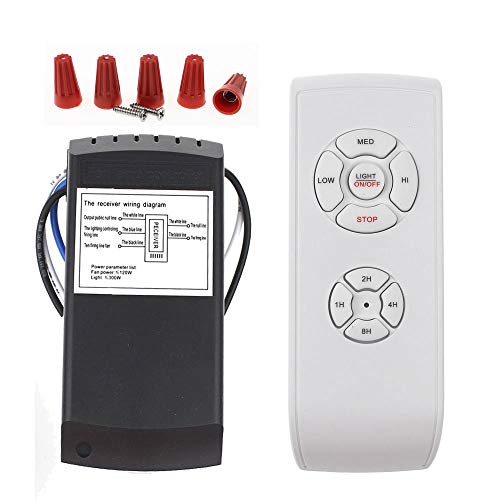
Installing a Ceiling Fan With Separate Switches and Remote

Installing a ceiling fan with separate switches and a remote allows you to control the fan and light independently for added convenience and flexibility.
During the ceiling fan wiring process, you’ll need a three-conductor wire (14-3 or 12-3) from the switch to the junction box, enabling separate switch control.
Use a 14-3 or 12-3 wire from switch to junction box for independent fan and light control.
Connect the fan’s black wire to the black ceiling wire, the blue wire to the red wire for remote control operation, and ground wires together for safety.
Install the remote receiver inside the fan housing, then connect its wires—black to black, blue to red, and ground to ground—before securing the canopy.
In the switch box, split the power supply into two hot wires for the fan and light switches.
Follow wiring instructions carefully, observe safety precautions, and test the remote functions once installed.
Tips for Proper Mounting and Support
Ensuring your ceiling fan is properly mounted and supported is key to safe, reliable operation. Start by confirming the electrical box is rated for ceiling fans and securely attached to a ceiling joist, support bracket, or reinforced support brace for maximum stability.
Use the correct support hardware, like screws and brackets, to firmly attach the mounting bracket. Follow these tips:
- Attach the mounting bracket directly to a ceiling joist, support brace, or reinforced electrical box.
- Use the manufacturer’s screws for a secure mounting and reinforcement.
- Ensure the fan is level during installation for proper balance.
- For angled ceilings over 34°, select an appropriate downrod and angled mount kit.
Proper reinforcement and support hardware prevent wobbling or detachment during operation.
Testing the Fan and Light Operation

Before restoring power, double-check that the power is off to prevent shocks.
Once the power is on, turn on the fan and light to test all functions and speed settings.
Watch for any unusual noises or flickering, and verify the fan rotates correctly for the season.
Confirm Power Is Off
Always verify that the power is completely off before handling any ceiling fan wiring. Use a non-contact voltage tester to confirm there’s no electrical current at the wires.
First, turn off the circuit breaker controlling the fan circuit to prevent accidental shocks. Next, test the wiring with a voltage tester to ensure the power is off and maintain electrical safety.
Once confirmed, proceed with wiring or adjustments confidently. After completing the wiring, restore power and test the fan’s pull chains or wall switches to verify proper operation.
Also, check that the remote control responds correctly and the light kit functions as intended. Confirm the fan spins smoothly, is balanced, and the lights work before completing your installation.
Test Fan Functions
Once the power is confirmed to be off and your wiring is complete, turn the power back on. Begin testing the fan and light functions.
Use the switch or remote to test the fan’s operation. Check each speed setting for smoothness without wobbling.
Verify that the fan blades rotate correctly in the desired direction for the season—clockwise for winter, counterclockwise for summer.
Next, toggle the light switch or remote to ensure the bulbs turn on and off properly.
Listen carefully for any abnormal sounds like rattling, humming, or vibrations, which might indicate loose blades or installation issues.
Confirm that all control inputs respond correctly to your commands.
If any issues arise, troubleshoot wiring or switch connections before completing your setup.
Verify Light Operation
How can you confirm that your ceiling fan and light are wired correctly and functioning properly? First, turn the circuit breaker back on and test the fan and light using the wall switch or remote control.
Check that the light operation works as intended—turning on, dimming, or turning off smoothly.
Then, verify that the fan blades spin at all speed settings and that wiring connections are secure.
Perform safety checks for flickering, noise, or wobbling, which could indicate loose wiring or improper setup.
Operation verification helps ensure a proper setup. Remember to:
- Use remote control or wall switch for independent testing
- Confirm smooth fan blade rotation at all speeds
- Check light fixture for proper light operation
- Observe for any irregularities indicating wiring issues
When to Seek Professional Assistance

If you’re unsure about electrical wiring or the specifics of ceiling fan installation, it’s best to hire a licensed electrician. Complex wiring, such as remote control systems or multiple switches, can be tricky to handle securely.
If your electrical box is outdated or non-compliant with current codes, a professional can upgrade it to ensure a safe installation. When you encounter uncertain wire colors or inconsistent wiring patterns, an electrician’s expertise helps prevent incorrect connections and potential damage.
Structural modifications, like installing angle mounts or working on high ceilings, also demand professional assistance to ensure secure mounting and safety. If your wiring involves high ceilings, complex wiring, or upgrading an electrical box, don’t risk it—call a licensed electrician for a reliable, safe solution.
Frequently Asked Questions
Should I Use 12 or 14 Gauge Wire for a Ceiling Fan?
When deciding whether to use 12 or 14-gauge wire for your ceiling fan, consider the circuit’s amperage. If you’re on a 15-amp circuit, 14-gauge wire typically suffices.
But if your fan is on a 20-amp circuit or you plan to add additional loads, opt for 12-gauge wire.
Always check your breaker rating and local codes to guarantee safety and proper wiring.
How Should a Ceiling Fan Be Wired?
Did you know improper wiring causes over 50% of ceiling fan accidents?
When wiring your fan, connect the black (hot) wire to the ceiling’s hot wire, the white (neutral) to the neutral, and the green or copper to the grounding system.
If your fan has lights, attach the blue or red wire to the light circuit.
Always turn off power and follow manufacturer instructions for safe, correct wiring.
What Are the Guidelines for Ceiling Fans?
When considering ceiling fans, you should follow specific guidelines to guarantee safety and proper operation. Always match wire colors—black for hot, white for neutral, and green or copper for ground—and secure connections with wire nuts.
Use a ceiling box rated for at least 70 pounds and grounded properly. If your fan has a blue or red wire, connect it accordingly for light or separate controls, following the manufacturer’s instructions.
Is Safety Wire Necessary for Ceiling Fan?
Imagine installing a ceiling fan in your home and wondering if safety wire is needed. Usually, it’s not necessary unless specified by the manufacturer or local codes.
Most fans come with secure wiring and grounding that are sufficient. For example, in a typical residence, tightening wire nuts and following instructions is enough.
Always check your fan’s manual or local regulations to confirm if safety wiring is required for safety and compliance.
Conclusion
Now that you know the basics of ceiling fan wiring, you’re like a skilled pilot ready to take off. With safety and proper setup in mind, you can confidently install your fan and enjoy cool comfort. Just remember, if wiring feels like a maze, don’t hesitate to call a pro. Trust your skills, stay safe, and soon you’ll have a beautifully functioning fan spinning smoothly overhead.